
A Home Built Modular Solar Array Part 2
Finishing the build


Building the Array
The next step is to build the actual solar array.
1. You will need:
4–250-watt solar panels
16-Z-brackets and their mounting screws
3 – 8-foot 4x4s
3- 2-inch ID, 7-10-inch leg U-Bolts and their backing straps, washers and nuts.
2. Mark the exact center of the 3 – 8-foot 4x4s both across and length wise.
3. At the exact center and along the centerline lengthwise, position the U-Bolts and carefully mark where the holes must pass through the 4x4s.

4. Using the Portalign mounted drill, drill the holes using the 9/16-inch bit for the legs of the U-bolt to pass through. These holes must be square with the surface and parallel to each other or the back strap will not align properly when you try to install the U-Bolt, you will be several feet in the air you don't want to be struggling with this while juggling the 4x4.
5. This next step should be done somewhere level where you can lay the three 4x4 beside each other and lay the solar panels between them. Align the ends of the solar panels that have the connectors to the center of the 4x4 carefully place the Z-brackets where they line up with the predrilled holes in the solar panel, if they don't line up, mark and carefully drill new holes in the brackets, if possible, if not, in the solar panel sides, just don't damage the cells. Once everything is lined up, mount the brackets using the provided screws. Do not mount the panels to the brackets yet.

6. Once the holes are drilled and the brackets installed, use a ladder to position the first 4x4 on the axle. I found that pulling it up and balancing it on the axle was the easiest method then slide the U-bolt legs up from the bottom passing through the 4x4 and capturing the axle in the U portion, then slide the backstrap onto the ends of the legs and place a washer and nut on each, then snug them up with the proper size wrench. Repeat for the other two with one on each end of the axle and one in the middle. Be sure you arrange the 4x4s like you had them on the ground. Once you have attacked all three 4x4s attach the 2x4 endcap boards to stabilize the frame. Attach a rope to the center of the endcap opposite to where you will begin installing the first panels.

7. Once the 4x4s are mounted, rotate them on the axle so they are all on the same side of the axle and are positioned properly across the axle. Lift the first panel into position with the black (cell) side out. Position the panel between either the far left or far right 4x4 and the center 4x4. Hook one end of the ratchet strap to the center brace and over the axle the other to the bottom of the panel and tighten the strap by sliding it through its axle piece until it is tight. Ratchet the strap to slowly raise the panel until the mounting holes match up with the brackets you already installed. Once it is aligned, put in the mounting screws and tighten them. Repeat for the panel on the other side.
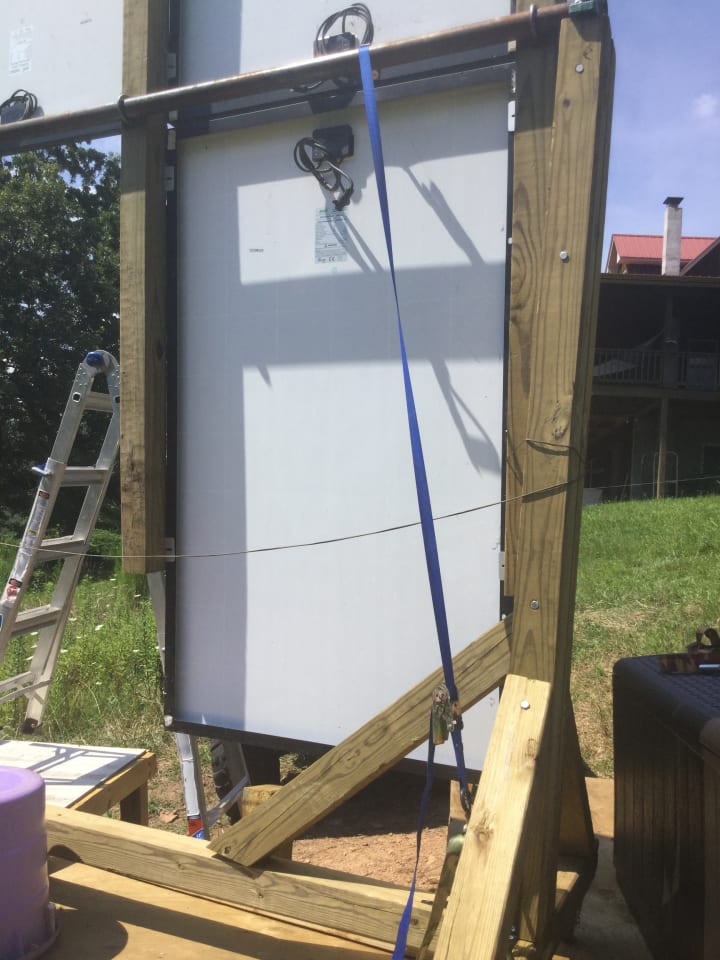
8. Once both panels are installed on one side, use the rope attached to the center of the endcap board on the frame opposite to where you started to rotate the frame, so the empty spots are now down on the other side of the array. You will have to tie off the frame to keep it from rotating since it will be extremely top heavy. Repeat step 7 for the two panels on this side. Once the 4 panels are attached it should be easier to rotate the array on the axle.

9. Using the deck screws, attach the operator side of one of the actuators (fat side) to the center brace and the other end to the center 4x4 of the array with the array at the proper angle for your location and time of year. Note that you might want to determine what the maximum angle the array has to be at and the minimum and position it at the minimum first since the actuator is closed.

10. Determine the positioning of the second actuator by rotating the array to the proper position, since the actuator is closed when you receive it, consider where you want it to end up when the actuator is fully extended and when it is fully closed, place it in the fully closed location. Using deck screws, attach the fat end of the second actuator to the platform such that it just reaches the spine of the carriage.

11. Attach the sensor to the spot in the center of the array between the panels.

12. Mount the solar tracker controller on the center support and attach the actuators and sensor in accordance with the provided manufacturer's instructions. Do not hook it up until the rest of the equipment is wired up.

Figure 23: Solar Tracker Controller
13. Next, you must decide (hopefully you did before you bought a bunch of stuff you don't need) do you want this grid attached or standalone. For grid attached it is best to do two strings of two panels wired in parallel, for a standalone, 4 panels wired in serial. If you decide on the grid attached, you will need an additional connector that allows you to wire the panels together in parallel. If you do 4 panels in serial, you just daisy chain the panels through their existing connectors leaving one positive and one negative connector for the entire array.
Hooking Up
The final stage is getting the arrays wired together and hooked to either the charge controller, battery bank and inverter or to a grid tie inverter setup. I will cover both.
Hooking up to a Battery Bank
For off grid setups there is no such thing as grid tie, so you must utilize a battery bank setup, unless you don't need power at night and during stormy weather!
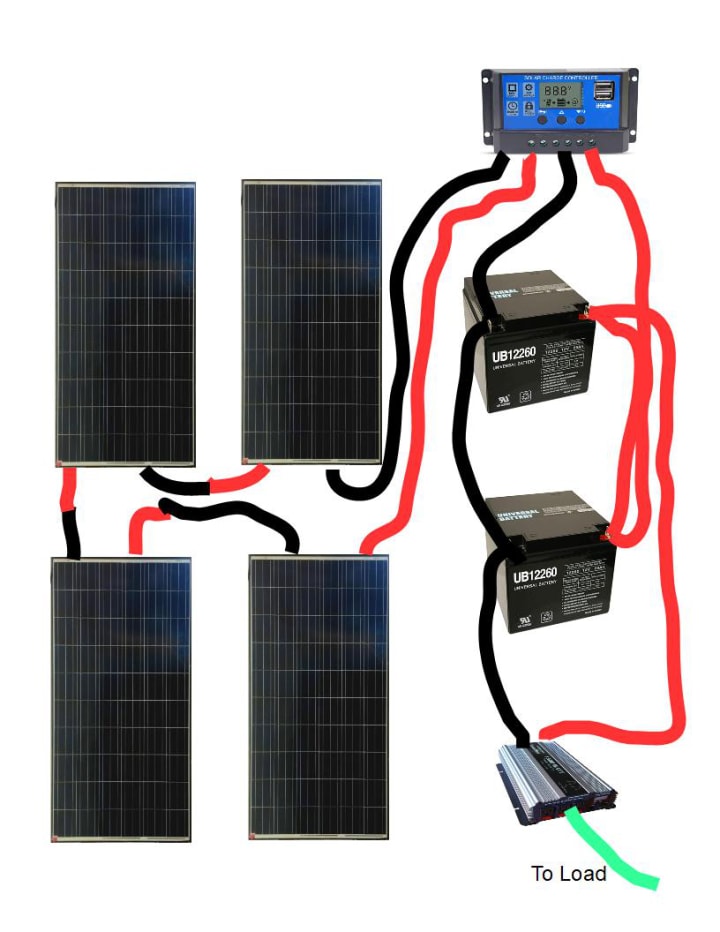
Depending on how much you want to spend you can get batteries that have hundreds of amp hours of power and last forever like lithium or Iron based or go with less expensive setups using lead-acid batteries. I chose a less expensive option using deep discharge golf cart/wheelchair batteries that have 26-amp hours at 12 VDC.
For battery bank usage you usually hook your batteries in series, that is, positive to negative in a ring. Be sure to hook up different ends of the battery string to the positive and negative of the charge controller and the inverter, this makes the system use the entire string of batteries. If you, like I did at first, simply hook the charge controller to the first battery in the chain and hook the inverter to the last, you will end up only getting the equivalent of 1 or 2 of your batteries before the charge gets too low.
Look at figure 10 to see what I am talking about. I left out fuses in the diagram, essentially you want a fuse of the appropriate amperage on the positive lead going to the charge controller from the solar array and one on the positive lead going to the inverter. Always hook up the batteries to the charge controller first, then the solar array and finally, the positioning system to the charge controller. If you fail to do this, you will burn out the charge controller. Learn from my mistakes!


Hooking up a Grid Tie system
A grid tie system sends power into the power grid when it isn't being used by the load. For a large system you should have a professional install it because it requires larger switches and automatic cutouts. Remember, a grid tie system will not provide backup power in a power failure situation, in fact, a compliant system disconnects in a power down situation to prevent electrocuting line workers upstream.
Some smaller grid tie systems simply plug into your house circuit and provide small amounts of power to supplement the house power, as such when the power cuts off. You should be sure to disconnect them as illogical as that seems. With the system I have, a backup generator automatically comes on after 10 seconds on power loss and cuts out the main line until it senses power is restored, so since it cuts the main line, I don't have to worry about shutting my grid tie off.
Grid tie systems are usually done with multiple strings of panels using micro inverters. In mine I tie two panels into a parallel string and hook that to the 1 KW inverter. Look at figure 25 to see what I mean. In a parallel hookup the positive goes to the positive and negative to the negative. You can see I used combiners to combine the positives and negatives from both panels in each string into a single positive and negative lead that goes to the inverter. The inverters are tied together through a simple connection block and a single lead is connected to a house plugin.
I decided not to use a positioning system on the grid tie array and just periodically reposition the system based on season of the year.

Figure 14 shows the parallel hookup for one string of the array through a combiner. The output from the combiner goes to one 1 KW grid tie inverter.

Figure 15 shows the grid tie inverters mounted on the array.
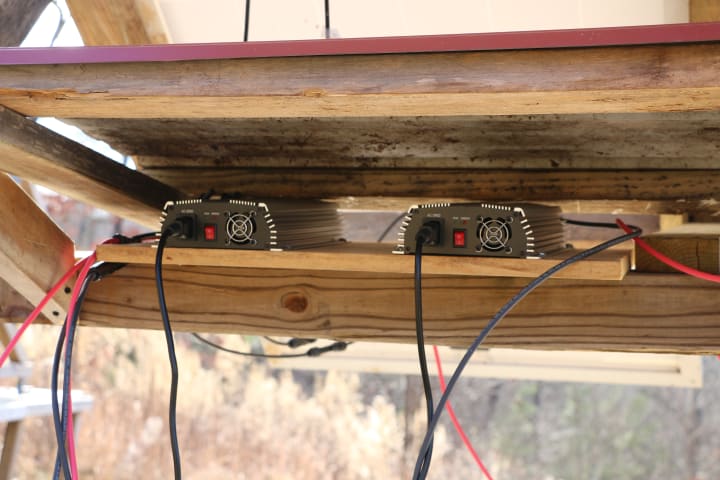
In Figure 15 you can see the two black cords that go to a combining block and then to a single connector to the houses grid. Notice I added a cover t0 keep rain off the inverters, they are also in the shade of the arrays being mounted on the support beam.
Summary and Lessons Learned
Summary
You can build your own solar array. You can buy solar generators for about as much as you will spend doing it. However, I have found most of the solar generators do not provide as many amp hours and you can't easily add batteries to them. If you take care and remember to measure twice and cut once you should be successful.
A quick look at Ebay shows 250 and even 300 or more-watt panels used for less than $200 each, some less than $100 with free shipping. Can't beat that price, however, remember that panels lose efficiency over time so find out how long they were in service before you buy. I bought mine from an overbuy that a contractor had on a project. Watch the shipping costs if shipping isn't provided, it can be more expensive than the panels themselves!
Lessons Learned
1. Get someone to help you if you can, solar panels weigh as much as 60 pounds and handling them can be difficult.
2. Follow manufacturer's instructions on hooking up solar charge controllers, batteries and inverters as well as positioning systems. It is an expensive mistake to have to replace brand new components when you hook them up incorrectly and they burn out. Oh, if you hook up a battery incorrectly it turns into a gas generator, since they are usually sealed, this can lead to an explosion. Luckily, I caught mine at the “It looks like a damn balloon” stage.
3. Make sure you have a stable ladder
4. Be sure the carriage of the array is anchored to the platform by more than the turntable, or you may be rebuilding the array.
5. Build the carriage on the platform, it is a real pain to try and get it up there after it is built.
6. Most panels are made of glass and silicon on a thin aluminum substrate backed by a thin polymer insulator in an aluminum frame, they are fragile and don't twist. If the glass gets crazed, you lose a lot of structural integrity and solar efficiency. A panel with just the surface glass crazed can be recovered using resin.
7. If you aren't off grid, use a special switch that hooks both the array and your house current to power loads that switches between power sources automatically.

Be careful, cover the panels or work at night to keep from painful and possibly deadly electrical shocks when making connections. With some elbow grease and careful work, you can build your own solar arrays.
About the Creator
MICHAEL ROSS AULT
I began writing at age 13. Short stories, novellas, poetry, and essays. I did journals while at sea on submarines. I wrote technical books for a decade before I went back to fiction. I love writing, photography, wood working, blacksmithing
Keep reading
More stories from MICHAEL ROSS AULT and writers in Earth and other communities.
A Home Built Modular Solar Array Part 1
Introduction I decided to design and build a solar array that was modular in nature and would allow a homestead to add modules as needed in 1-2 KW increments. I wanted the arrays to be elevated, and X-Y positional to take maximum advantage of the sun.
By MICHAEL ROSS AULTabout a year ago in Earth
War between Russia and Ukraine on May 16: Ukraine's elite brigade collapsed. Russia completely controlled Rabotino
Hello to all viewers of the Panorama K 24-hour program. Recently, the Russian army announced the reclaiming of control over the village of Rutino in the Jaboria province, a claim disputed by Ukraine. Ukraine promptly refuted this announcement, stating that the Russian army was still positioned only on the outskirts of Rabo Tino. The Russian Ministry of Defense declared on May 15 that their army had restored control over a key village in Rabino, in the Japia region. According to this Ministry, the Russian army captured village R in an assault that led to Ukrainian forces losing soldiers and a specific US-made M777 artillery gun. The Ministry of Defense stated that Russia's units of the Dan Nipe Army Wing have gained complete control of Rapoo village in Japia province. Simultaneously, numerous soldiers and equipment from the 65th mechanized brigade, the 121st Territorial Defense Brigade, and the 23rd brigade of the Ukrainian National Guard in the Malayia region, including Nikopol and Zoroa Panka, were eliminated from the battle. The Ukrainian Army rejected reports of Russian forces taking control of Rapoo village in the Japia region. Lieutenant S. Kichik, spokesman for the 65th Ukrainian Brigade, claimed that the Russian army was only on the outskirts and that the Ukrainian army still held a strong position in the village, combating daily incursions. The Russian army attempted to establish a foothold daily, although Ukrainian forces maintained control over most of the village. The Ukrainian army disclosed that they withdrew from areas in Lukian and V Chan near Khob to safeguard troop lives. Additionally, the Russian army repelled 10 Ukrainian counterattacks in Cuba. The units of the Western battle group fortified their positions on the Front Line, inflicting casualties on the air brigade's formation near the border number 1468 of Ukraine, close to the settlements of Petro Paroka in Khob, Stens Maroka, and Nadia in Luhan. On May 15, Russian President Vladimir Putin stated that Russian forces were enhancing their positions daily, with military operations proceeding as planned. Moscow launched a significant surprise attack on the Kh Cop area while Ukraine faced challenges with armaments and manpower. Rapoo, situated on the Front Line in the Zoria region, was previously considered a strategic victory by Ukrainian authorities during a counter-offensive last summer. Ukrainian President Vladimir Zelenski regarded Tino as a symbol of the country's defense and resolve. To recapture Rapoo, Ukraine deployed Western-trained brigades for strategic operations. Governor Zoria Yevgeni Balis acknowledged that Rapoo currently lies in a gray area, indicating the Ukrainian army's loss of control. The struggling Ukrainian air defense system in this region has enabled Russia to execute assaults using highly mobile rocket artillery systems similar to Ukraine's Himes. Russia has escalated its use of UAVs to gather intelligence on Ukrainian positions, preparing to target guided tactical missiles. Jack Watling, a senior researcher at the Royal United Services Institute in London, highlighted the increased presence of Russian UAVs, aiding in precise target identification and destruction behind Ukrainian Front Lines with Iskander tactical ballistic missiles and rocket launchers such as the Tornado S system. As per military experts, Russia's current assaults mirror the attacks launched by K. Moscow against Ukraine with missiles from the HES system. Russia aims to target Ukraine's air defense system and helicopters, although these attacks have had limited success. Russia initially struggled to conduct similar attacks to Ukraine's Himes due to lacking precision targeting capabilities and timely intelligence. The Himes system, a self-propelled multiple launch rocket artillery system, possesses high firepower and mobility, capable of hitting targets up to 300 km away. The US has delivered at least 39 Himes systems to Ukraine. These attacks have paralleled glide bomb assaults since the Russian air force gained enhanced mobility, straining the Ukrainian military further, already grappling with manpower and armament shortages. Russia advances on the front lines, gearing up for a summer offensive that could intensify pressure on the HCOB region and surrounding areas of Japan before assaulting the Donbas. Ukraine anticipates aid from Western countries to bolster its combat capabilities. Without swift artillery, air defense systems, electronic warfare systems, and other support from Western nations, Ukrainian forces will encounter challenges. Although Ukraine assesses a chance to repel Russian attacks in the near future, mobilizing adequate soldiers and implementing a training regimen remains imperative. Failure to secure necessary support could impede Ukrainian forces.
By Thế Ánh Đặng4 days ago in Earth


Comments
There are no comments for this story
Be the first to respond and start the conversation.