
Linux Commands You Wish You Knew Earlier
Linux users should know a command or two, there are things that cannot be done in any other way. Let’s look at some interesting things that we can do with a few commands.


For someone who used Microsoft Windows for what I consider a very long time changing to Linux was a big challenge. But, I didn’t really change not entirely anyway, I started using Linux more and more each day.
Looking up new Operating Systems and the changes made in each release is quite interesting to me. I enjoy creating virtual machines and testing new things just for the fun of it, and of course to learn a bit more about each OS.
Today we’re not really going to focus on a specific Linux Distribution but a few commands on most Linux systems that can make our lives easier.
I am of course talking about Ubuntu, Debian, Mint, Parrot, Pure OS and many more. We’ll start with:
#locate
This term and command helps us figure out the location of an application or a file on our system. The first line is usually what we’re looking for.
The lines that follow may be configuration files or services from the same file used by other applications, the actual system or different versions of it.
For the purpose of this example I’m going to try to locate “Proxy chains” configuration file. The program comes per-installed by default on Kali Linux so all we have to do is locate it. I am on Kali Linux 2020.2 and we will check how we can confirm that using the terminal as well later on. After my quick search what follows is nothing more but the requested information:
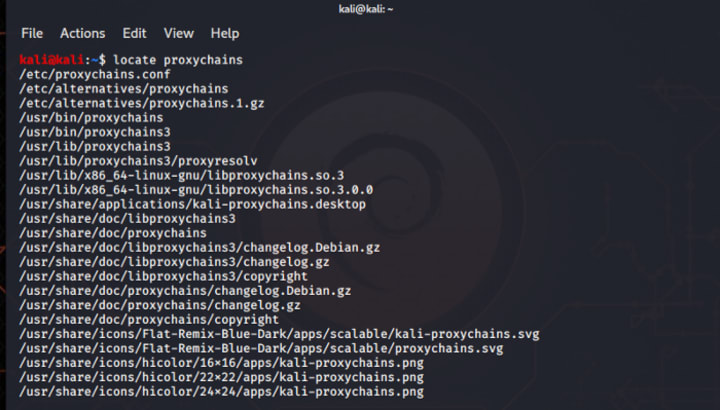
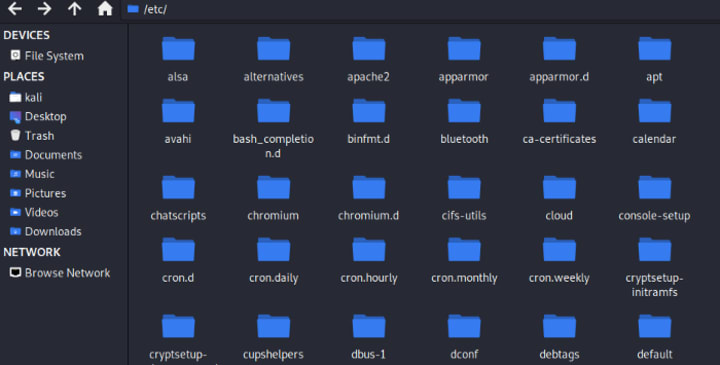
So, this /etc/proxychains.conf is our path, by following the same we get our config file which is exactly what we’re looking for. Since all I wanted to do was to locate the program we can now erase all we have in our terminal by typing in “clear” and hitting enter. What follows is the GUI version of what we just saw on our terminal using the file manager.
I didn’t just locate proxy-chains by coincidence the VM I’m currently using was moved (from one device to another) so, I really wanted to check what configurations were made on the file before as I don’t remember anymore. I plan on using the file for my next post we’re going to look at how we can use this instead of a VPN for security purposes. But, of course that’s a story for another day moving on …
Unlike Windows, with Linux we’re forced to do more to get results, and even if you’re not a programmer or a fan of the terminal to make your life easier you need to know a few commands. You’re obviously not obligated to learn but if you do it helps a lot.
#service network-manager
It is very common for you to install a new system and not have access to the internet right away especially if the installation was offline. Sometimes we only get to use a wired (Ethernet) connection because WiFi may not be working. At times the whole network manager stops functioning and you have to put it back to work yourself.
I don’t know how to put the network manager to work on Parrot OS, Ubuntu, Kali Linux or any other distribution using settings on whatever GUI app I’d also like to believe that you cannot do so on some Linux Distributions, if not most.
Now, going to back to our scenario if you install a new system or boot into your computer to find out that your WiFi connection doesn’t show up on the list or is not recognized it might be your network manager.
This being the case all we have to do is either#start,#stop and sometimes #restart it. That usually does the trick. What never changes is the
#network-manager in your command. If you’re signed in as an administrator you can avoid using sudo but if you’re not just do it like this:
#sudo service network-manager {start|stop|restart|reload|force-reload|status}
I stopped mine, now what follows below is me putting it back to work. I listed all the options you have with the network manager command but of course you can only use one at a time.
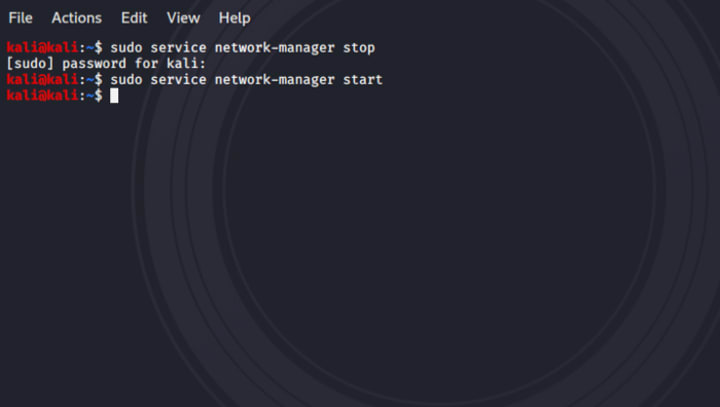
It works every time.
Network manager off:

This is my screen with the network-manager turned off. At the top next to the clock is my network signal. This is how it looks when I stop the network manager.

This is a different screenshot as you can see the icon gained more color, it’s brighter. Look for these minor changes when you try any of the network-manager commands just to make sure they’re actually working. But, you can also check the status afterwards.
#man
The first command that I introduced right at the top is #locate, what would you do if you didn’t know how to use it or what it’s used for? Luckily we have a manual that lets us know how and what these commands do, and to have that information we use the #man command. To find out what locate is used for I’ll just type in #man locate. And, this is what I get:
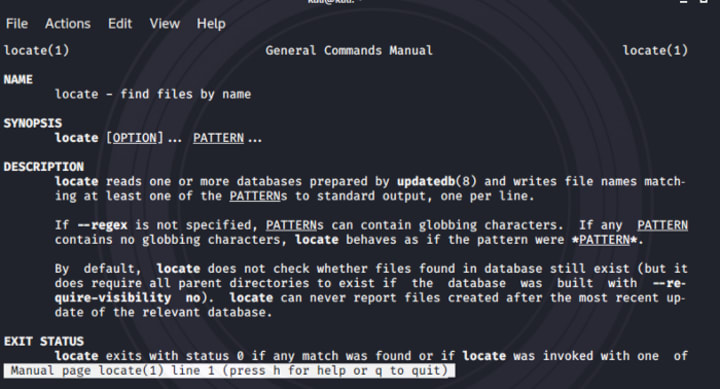
After reading press *h* if the information here isn’t enough and you need more help or *q* to quit. The interesting thing about man is that we end up discovering more ways we can use the command we’re looking into by learning about what it does and what we can use the command for.
#dash-dash help
Similar to the man command — help gives you information about the command you’re looking into. While man tells us more about what the command does, #help let’s us know how to use it and the various options we have. To use this just type in the command you need help with followed by- -help. A simple example would be #locate-space- dash dash help/locate - -help.
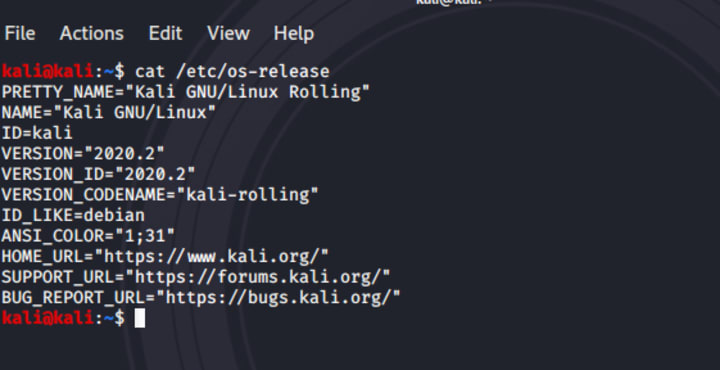
How can I confirm the version of my Linux Distribution using the command line interface?
First we need to find the release file, for that we need to locate the file:
#locate release
It is actually called “os-release” but we didn’t know that did we?

It was still a perfect match and we got exactly what we wanted. We can view it on our terminal by using the #cat command. Basically #cat allows us to view the content of the file on our terminal. the command will be “cat” followed by the path that gets us to the release file. All we’ll have to do is copy the first line of the results we got.
There you go, some of these commands really save the day. Go Open Source.
This was previously published on Medium by me https://medium.com/linux-for-everyone/linux-commands-you-wish-you-knew-earlier-df9374119376
About the Creator
Keep reading
More stories from Sam Writes Security and writers in 01 and other communities.
2 Must Use Browser Alternatives For Android Smart-phones
Maybe I took it too far, but hey I couldn’t help it I got carried away. And, you might too once you realize you have an option — or two. Android smartphones come with basic, and everyday apps like your dialer, messaging, contacts and calendar app. These aren’t the only apps that come with your phone though. Google apps like one drive, Gmail, and Chrome browser come pre-installed as well.
By Sam Writes Security3 years ago in 01
Jaipur Metro: A Guide to the Pink City’s Rapid Transit System
I love going by the metro train in any city where I can. Chhavi and I have been visiting Jaipur much of the time for her tennis competitions. We stay at Ibis Jaipur which is right close to the common lines metro station. I currently routinely utilize the Jaipur Metro, especially to go to the old city as I can keep away from all the traffic. We additionally use it much of the time to go back and forth from the Jaipur Railroad Station.
By prashant soniabout 12 hours ago in 01
In The Blink of Her Eye
Time itself bent and morphed, allowing Shannon the precious seconds needed to see and adjust to the disaster unfolding in front of her. Each frame showed minute details she would have missed had the clock not slowed down until she heard every click of the hands as they swept toward the end of everything. If only she was being melodramatic...
By Lisa VanGalen2 days ago in Fiction


Comments
There are no comments for this story
Be the first to respond and start the conversation.