


I was working with some security distros kali, parrot security OS, etc, and was playing with some attack tools, using virtual machines and it was working very well.
For those who don't know about security distros or Kali Linux, then these are penetration testing distros, in other words, these Linux distros are used in the cyber security atmosphere and are pre-loaded with attack tools and cyber arsenal. Now one could think that is it legal to use these tools or such an Operating system? Then the answer is, keeping a gun for safety purposes or learning and keeping a gun for criminal activities are two separate things, same is the case with cyber security, as if one uses it for learning or helping purposes then it is not an illegal activity, but of course, he/she must be careful when playing around with these kinds of distributions or tools. Now there are various methods for installing and practicing these tools and attacks, for instance, virtualization software is used through which virtually created machines are used as test labs to practice these gadgets. Although one can install these normally like other OS i.e Mac or Windows but it depends on the need or use.
I was also using a virtual machine on a popular and open source virtualization software called Virtualbox and was practicing with various tools but when it came to the wifi tools, virtual machines have issues using the wifi adapters. I felt the need to install kali on an external hard, I do know persistence is a way too, but both methods have their pros and cons. Besides, I have an external 80GB HDD which was of no use to me so I thought to make use of it.
I saw this method somewhere once, and it works very well there is even no need to use Rufus or Unetbootin, etc and there is no need to reboot for an external installation.
Here are the steps:
(1) Connect your external media with your pc and open Virtualization software (I personally use Oracle Virtualbox) and create new.
(2) Provide name, select VM location/directory i.e C:\, and choose OS type and its version i.e Linux and Debian, and hit next.
(3) In the next screen select RAM memory according to your system handling, click next.
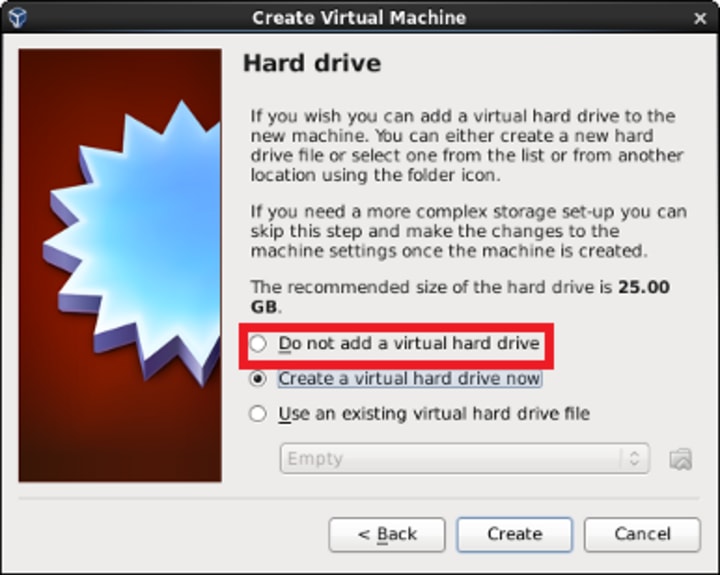
(4) Now in the next screen we usually create or select a .vdi image but in this case choose the first option i.e Do not add a virtual hard disk, a warning will pop up but click continue.
(5) Now comes the most important portion, select this newly created virtual machine and go to settings.
(6) Go to the USB option and select the USB radio button according to your (external media) USB version i.e 2.0 or 3.0.
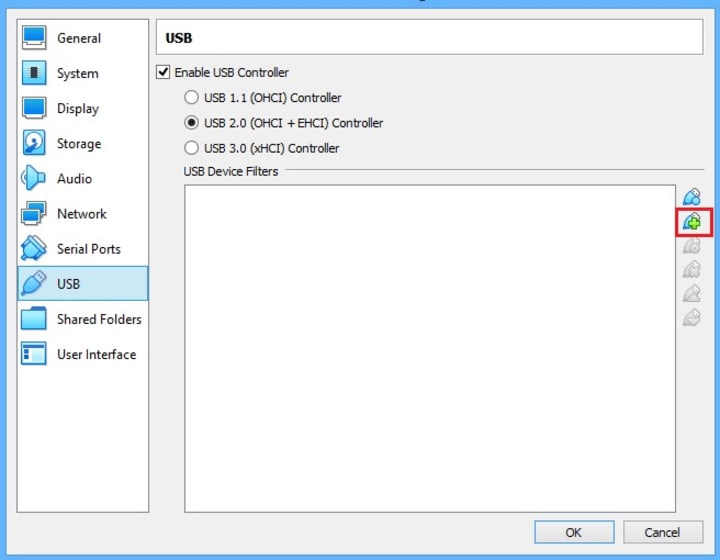
(7) On the right side of this panel there is a small USB icon with a green + sign on it which says "Adds new USB filter...", click on it and it will show the connected USB devices.
(8) Select your external media device i.e HDD or USB and it will be added.
(9) Now go to storage and click on the Empty Disk option then select your kali image.iso file for installation.
(10) Also before starting the machine adjust your core or RAM or other options as well.
(11) Click on start, Virtual box will pick up the USB media device and the installation screen will come up.
(12) Installation process will detect the disk and will show your external media drive, select it and proceed with the installation.
(13) Once the installation is complete, reboot your pc to boot into the external drive kali machine.
About the Creator
Mr.Khan
I like to write in Education, Social, History, Tech & cyber sec, sometimes psychology/sentiments too.
Oh, and btw love to talk about horror and paranormal stuff ;)


Comments
There are no comments for this story
Be the first to respond and start the conversation.