

Hello, we are back with our next article in a series of native iOS development. In case you would like to refer to our previous articles, you can find them here.
So in our previous article we read about application starting points and understood how an iOS application boots up and which is the very first method that is called.
In this article we will understand what is the starting point of the UI or user interface of the application. We will understand which is the very first UI element created and how the very first screen of application is visible on device.
What is UIWindow class?
Before we proceed further in understanding how the UI entry point works, we need to first understand the concept of window in iOS application.
Window is the root element on top of which your application UI sits. Window is the very first UI element that is created before any other UI element. To create a window element in an iOS application we use the UIWindow class of UIKit.
Let’s now understand how an instance of a window is created and how the very first screen appears on the device.
Before iOS 5
Way before in the old days of iOS development before iOS 5, .xib files were used to create application user interfaces. So when we created a new project before iOS 5, below is the code that was added by default to applicationDidFinishLaunchingWithOptions(used short form here. Actual method is described below) method of AppDelegate class.
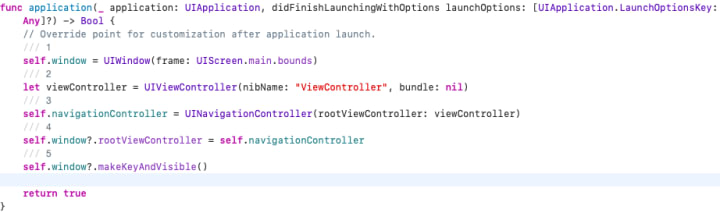
Let’s understand step by step what is happening in code shown above.
- Create an instance of UIWindow class using screen size.
- Create an instance of UIViewController subclass which will be the first screen to be visible.
- Create an instance of UINavigationController with view controller instance as root.
- Assign the UINavigationController to the root view controller of the UIWindow instance.
- Make the window instance as a key window and make it visible.
This is the all code you need to launch your first screen. Even today while writing this article we can use this traditional approach to start our application UI instead of using storyboards and SwiftUI.
With Storyboards
So after iOS 5 we have storyboards now which are used to develop the user interface for our application. There are basically 2 methods to configure entry points for application UI.
1. Using info.plist
After iOS 5 when we create a new single view application project using Xcode, a file called Main.storyboard is created.

The name of this file is set for UIMainStoryBoardFile key in info.plist file.


This tells the application to use Main.storyboard as the root or entry point for the UI of our application. We can change this startup file to our custom storyboard file.
The name of the storyboard file in info.plist for UIMainStoryBoardFile key is enough to set the storyboard as an entry point. We do not need any code for this. The first view controller in your storyboard file will be the first screen launched on device.
2. Using code
However we can also configure the startup storyboard with the code as well. Refer code as below which is written again in applicationDidFinishLaunchingWithOptions method of AppDelegate class.

Let’s understand step by step what is happening in code shown above.
- Create an instance of UIWindow class using screen size.
- Load your storyboard by creating an instance of UIStoryBoard, by passing the name of your storyboard file.
- Create instance of view controller using instance of storyboard.
- Create an instance of UINavigationController with view controller instance as root.
- Assign the UINavigationController to the root view controller of the UIWindow instance.
- Make the window instance as a key window and make it visible.
So you can use either of the above 2 methods described to configure the entry point for your user interface.
That’s it for this article. We hope now you have a fair understanding of how and from where the user interface of your application is bootstrapped.
Thanks for reading this article. If you have any queries related to this topic or iOS, Objective C and Swift. Please write us at [email protected] or direct message us on instagram at conficle(instagram username).
Also keep watching this space for upcoming articles on iOS development, software development and technology concepts.


Comments
There are no comments for this story
Be the first to respond and start the conversation.