
How to Freely Host a WordPress Website Using Google Cloud Platform
A 2021 Tutorial. Easy even for non-technical people :)


This is a step-by-step tutorial which explains how to host for free a WordPress website using Google Cloud Platform.
How long does it take? It could take less than one hour if you pay attention and follow the instructions. Else, it might even take two hours.
A note for non-technical folks: Although this might seem intimidating for you, I assure you that it is far less complicated than you think. In order to succeed, simply follow the instructions. I sure didn’t fully understand everything when I did it the first time. I merely collected bits of information online and brought them together in order to do it. But hey, it worked really well!
Side-note: I tried it when I was interested in learning SEO (search engine optimization). I set up www.securitystudiesreview.com to learn-on-the-go. But I’ve since decided it was not the career path for me. Also, this initiative actually gained traction, very much increasing the traffic to it, so I’ve since decided to host it with Substack.
In short, the steps are:
(1) Create a Google Cloud Platform account;
(2) Set up a virtual machine/compute engine to run (using Google’s Google Cloud Platform Free Tier offerings to avoid unnecessary costs. You can google GCP Free Tier for more info https://cloud.google.com/free);
(3) Link your domain and the website;
(4) Set SSL certificate (secure website);
(5) Set billing alerts (just so you can sleep better at night); and
(6) A few recommendations for your website.
THE STEPS:
Part 1
Create a Google Cloud Platform Account
1. You need to have a Gmail account. If you don’t have one yet, simply create one at www.gmail.com.
2. You need a domain name.
2.1. If you already own a domain name, please make sure you have access to your account on the domain registrar’s website. That is, the entity you bought the domain from.
2.2. If you need to buy a domain name then go ahead. Remember that there are a number of places you could buy it from, e.g. Google Domains; NameCheap; Domain.com; GoDaddy; and so on.
Consider comparing offers, and beware of the fact that a cheap first year might come at the price of expensive renewal rates.
3. Setting up a Google Cloud Platform Account:
3.1. Go to www.cloud.google.com.
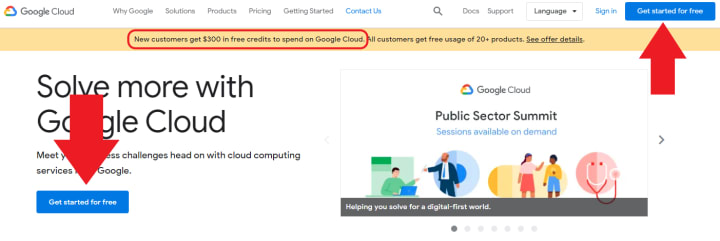
3.2. As in the picture, Google offers new customers $300 in free credits to spend on Google Cloud Platform. Click as shown in the picture.
3.3. Complete the two steps to create your account. You’ll need to provide Google with your address and credit card, but they will not bill you even after the free 3 months trial time unless you manually re-visit the website and confirm that you are interested and willing to be billed for the services.
That noted, unless your website is receiving a lot of traffic then the costs should be anywhere between less than 1 NIS and, say, about 10 NIS per month.
I show further down where to add billing notifications so Google will send you a message in case you are expected to or crossed a certain amount of money. Eliminate the option of surprises so you can be carefree.
Part 2
Setting up the Virtual Machine on Google Cloud Platform
4. Once you’ve created your account, you’ll see at the top left corner: (1) three stripes icon (the navigation menu), (2) Google Cloud Platform, and (3) “My First Project”.
Click “My First Project”. Then click the “NEW PROJECT” button and fill in the details. Next, click “CREATE”.

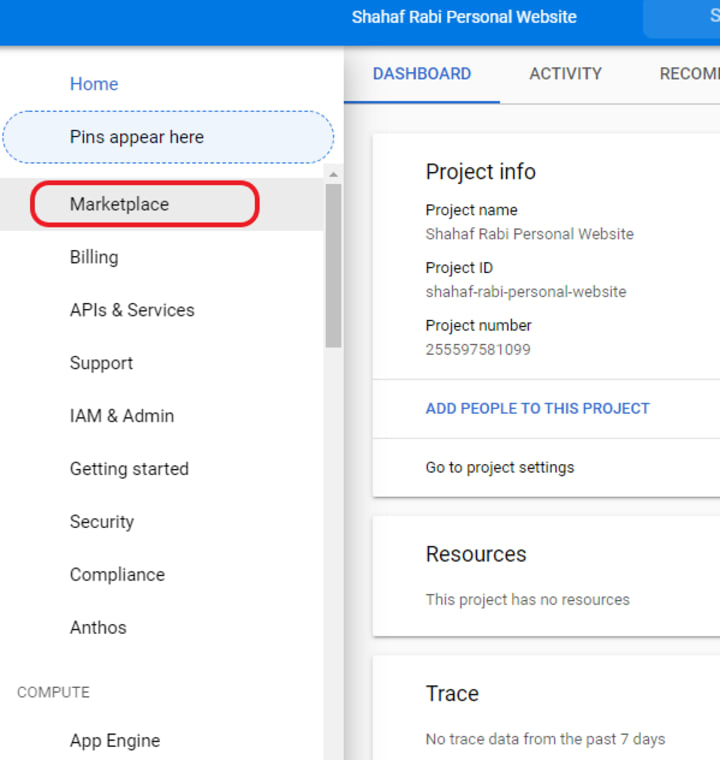
5. Now go to the “Marketplace” area – as shown in the navigation menu.
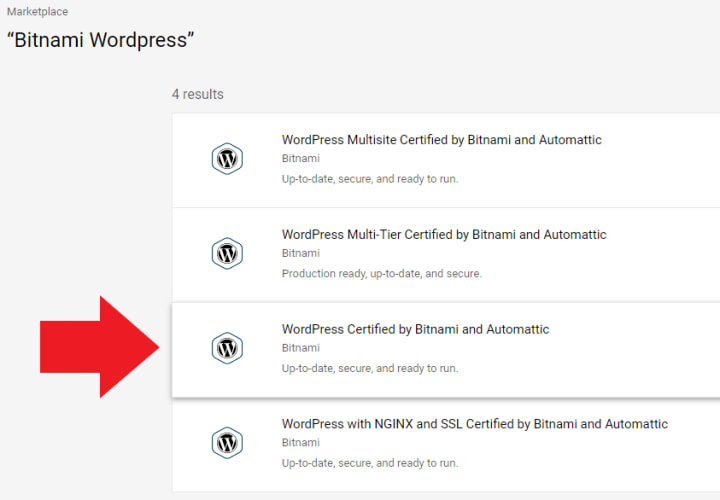
6. Write in the search “Bitnami WordPress” and press Enter.

7. You’ll get four results. Choose “WordPress Certified by Bitnami and Automattic”.
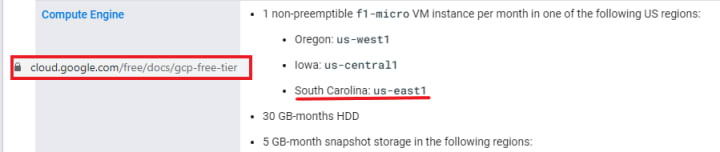
8. You should ignore the “estimated costs” written there as we will set everything to use and benefit from the free tier offers of Google. For more information, see: https://cloud.google.com/free/docs/gcp-free-tier
9. Click “Launch”, and you’ll also need to click the pop-up to enable billing. Loading takes about 1-2 minutes.
10. Once it finishes loading, you’ll be facing an important form. Pay attention when filling the following details.
*as we’ll proceed, you’ll also notice that the estimated cost per month appearing at the right section will be updated and will start going down*
*For additional information, see: GCP's free tier usage limits *
10.1. “Deployment name” – Any name you wish. I recommend using the same name as you named your project.
10.2. “Zone” – Very important. You must choose one of the servers within Google’s free tier. But you’d also be better off choosing the server which is geographically closer to the people who’d visit your website (i.e. your target audience).
For instance, if you are setting up a website in which your target audience, e.g. customers, are located in California, then you should choose a server in the west of the United States (in that case, Oregon: us-west1).
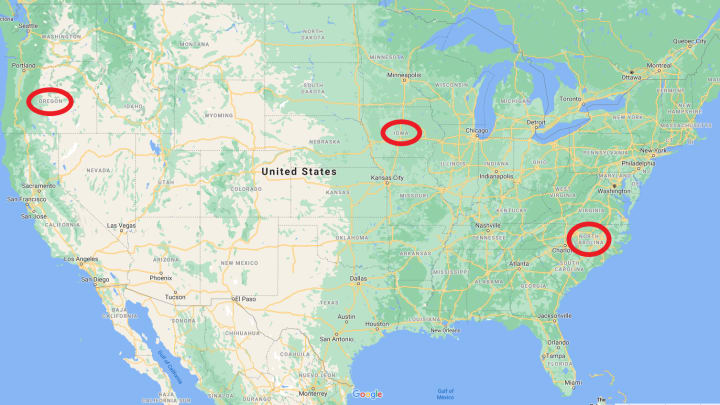
Additionally, you’ll see various options with added letters after them (e.g. us-east1-a/b/c/d). Do not worry about the last letter. Just pick one.
10.3. “Machine type” – Change it from the default one to the “Micro” option. The free tier offer for virtual machines are one F1-micro. That’s why we choose the Micro. And worry not, from my experience, it works well.
10.4. Keep the “Boot disk type” as is.
10.5. You may increase the “Boot disk size in GB” into 30 instead of the default of 10 since Google offers “30 GB-months HDD” in the free tier.
10.6. Keep everything else precisely as it is – change nothing.
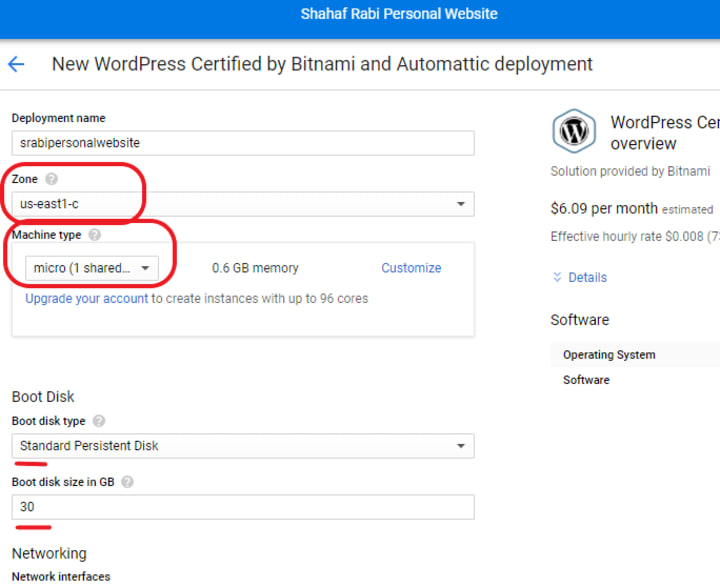
10.7. Mark and accept the GCP’s terms of service (after you read it, of course).
10.8. Click “Deploy”.
10.9. It’ll need some minutes to finish deploying.
11. Once deployed, you’ll get to this page:
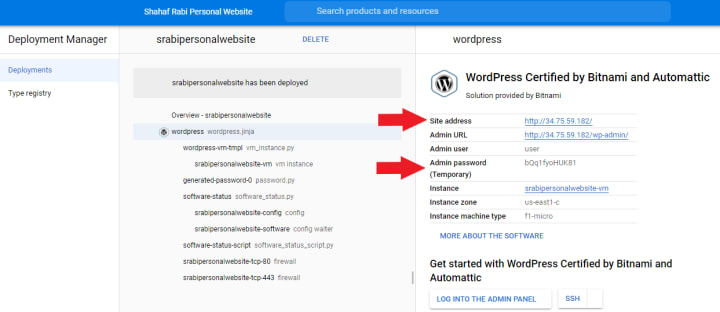
Note the emphasis in red: site address (you may click it already and see that there’s a website online); as well as Admin user and password (which you can click the “LOG INTO THE ADMIN PANEL” button below. It’s highly recommended that you change the password!
Part 3
Connecting Your Domain Name
12. The process of connecting your domain name with the website: (1) make the site address (IP) static; and (2) connect your domain name to the static address.
12.1. Go to the navigation menu > under networking, choose VPC Network > and then External IP Addresses.

12.2. Click the “Type”, as in the picture, changing it from Ephemeral to Static.
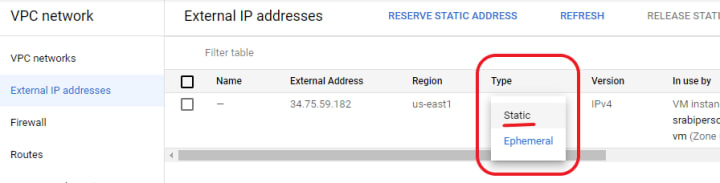
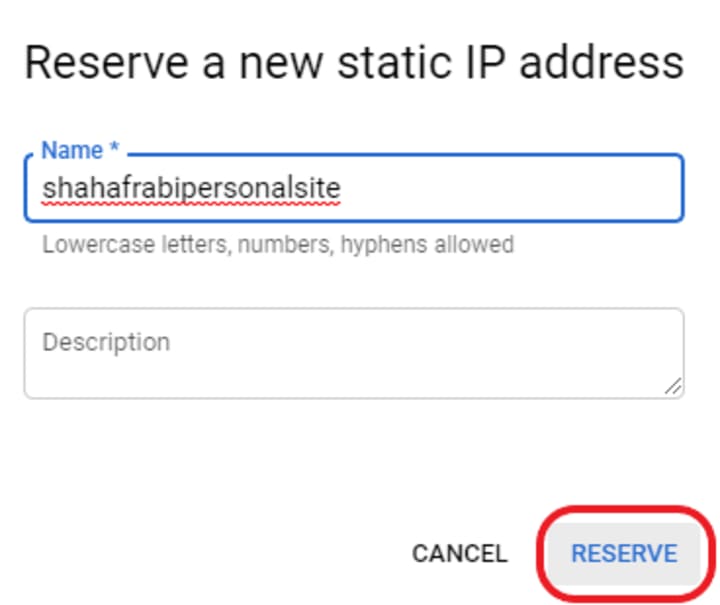
12.3. You’ll see a pop up. Simply write a name, add a description if you’d like, and then click the Reserve button.
13.3. Superb! Done! IP is now static. Now let’s connect the domain name to this static IP.
***Keep a copy of this IP site address because we’ll need it soon.
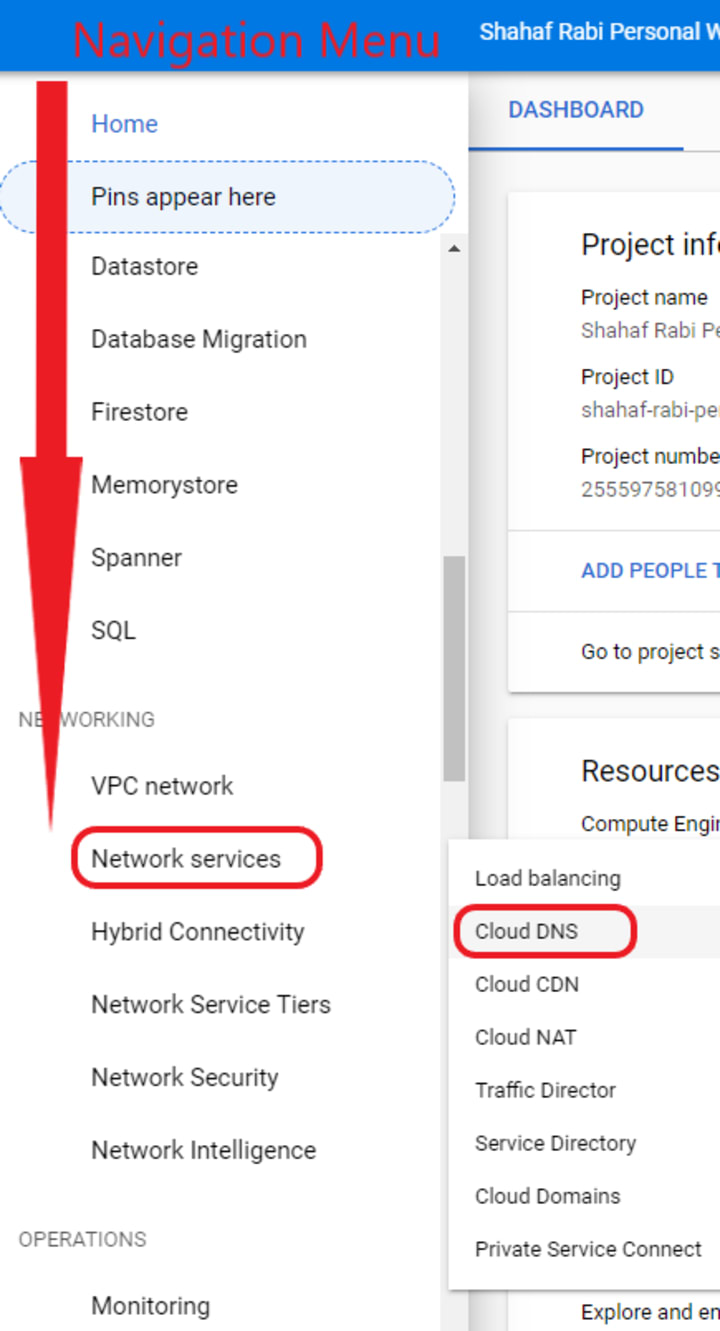
14. On Google Cloud Platform, click the Navigation Menu again, then scroll down again to Networking, under which, now select Network services, and then Cloud DNS.
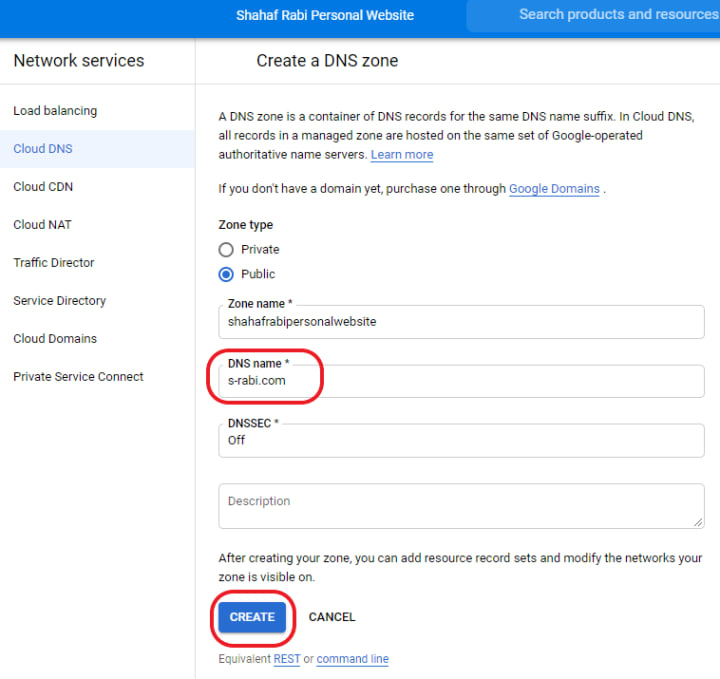
14.1. Click “Enable” and then “Create Zone”.
14.2. For “Zone Type”, keep it Public. For “Zone Name”, write whatever you want. For the “DNS name”, write the name of your domain as in the picture below. Keep the DNSSEC off and click the Create button.
14.3. Click “ADD RECORD SET” as in the picture.
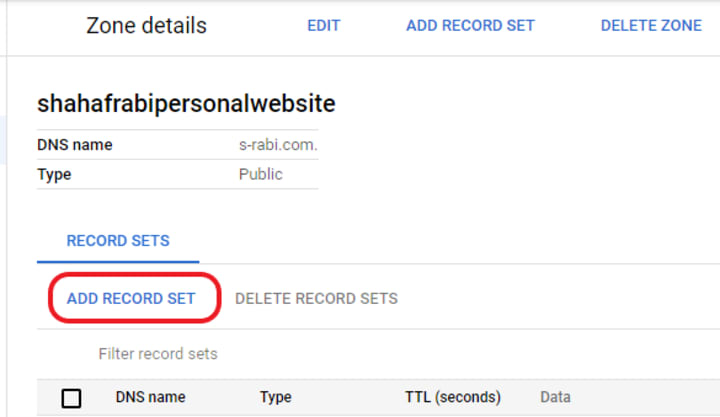
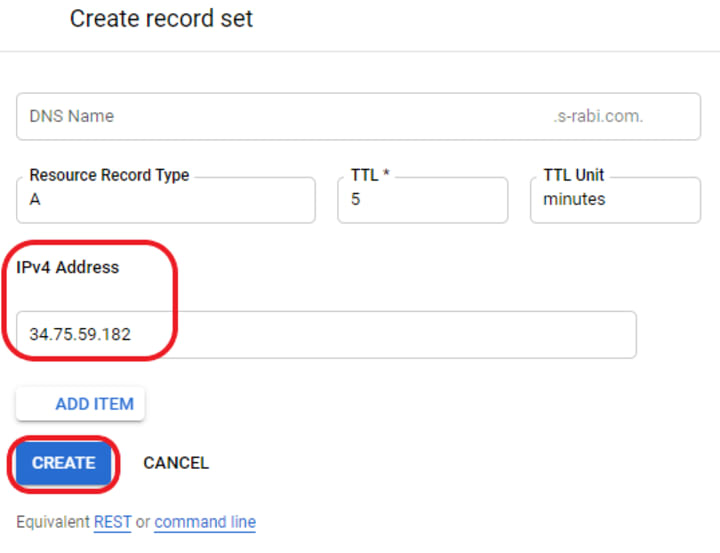
14.4. Insert the IP site address and click “Create”.
14.5. Click the “ADD RECORD SET” again.
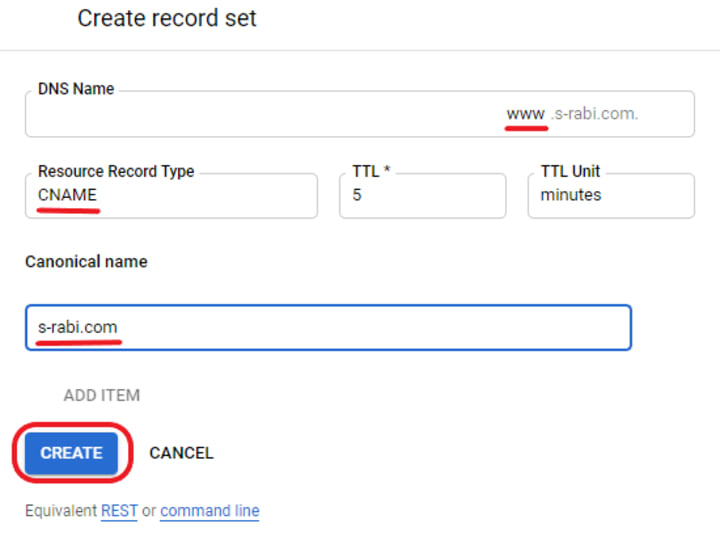
14.6. This time, add “www” within the DNS name and as for the “Resource Record Type”, choose CNAME, and under Canonical name, write your domain address. As in the picture.
Great! Let’s move on.
15. In another browser tab, go to the website from which you bought your domain and access your account.
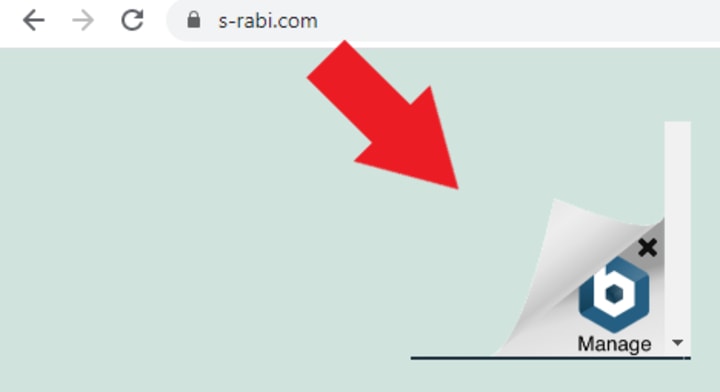
15.1. Find the Domain DNS settings area. I bought www.s-rabi.com from GoDaddy, so that’s the example I show. If you bought your domain from another place, it’ll look a bit different.
If you can’t find it in your case, check the site’s FAQ/resources or simply look for examples online (YouTube is a friend).
15.2. ***In case you already had a domain and that it was connected to a website hosted somewhere before, then you should cancel/unassign it before. In my case, for example, www.s-rabi.com was connected to a Wix website (if yours too then just go to the control panel for your site, go to Settings, Domain Manage, and find the option to Unassign it).
15.3. Go to DNS Management (should be under Domain Settings). We are interested in setting name-servers to connect between the domain name and the hosting of our site.
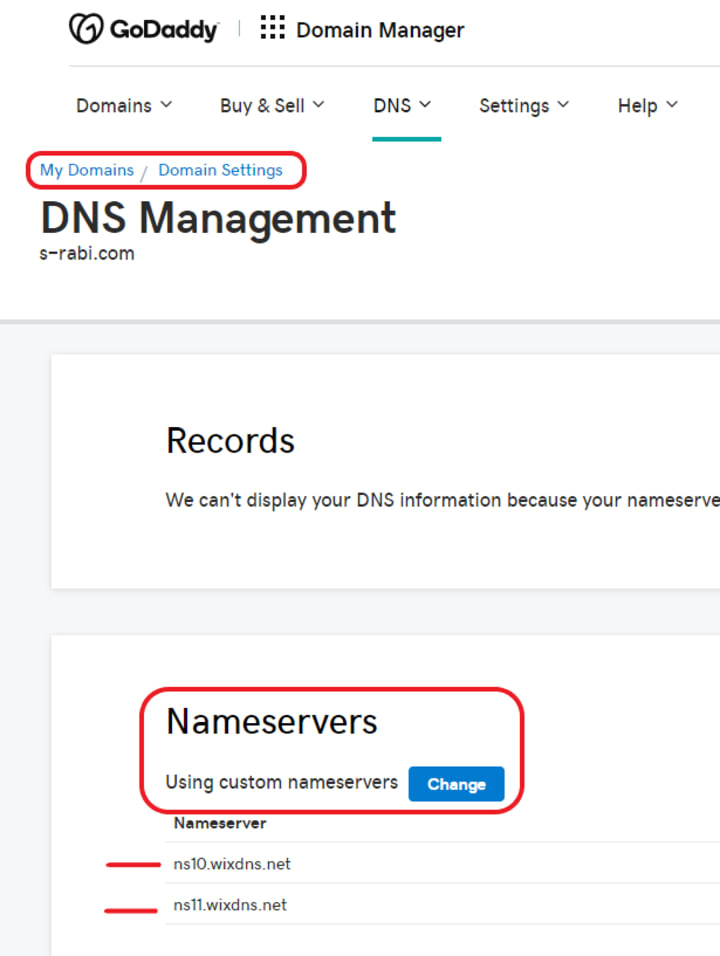
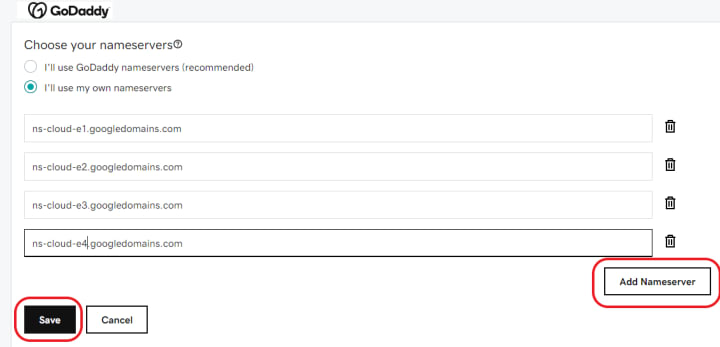
15.4. Click “Change” or any other button to edit the Name Servers – note that we’re looking for “Using custom nameservers”.
15.5. Copy from the Google Cloud Platform the NS records and insert them as custom name-servers that we’d like our domain name to refer people to.
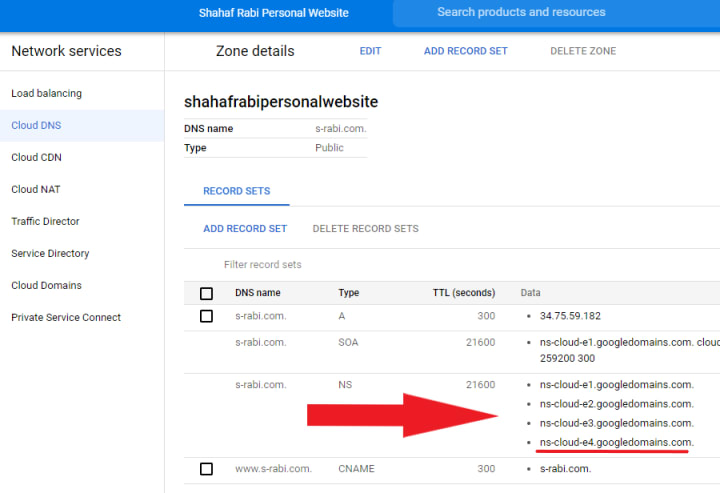
Two small tips: (1) do not copy the dot (“.”) at the end; and (2) the only difference between each NS record is 1 single number as you can see. So once you copy it once, you don’t need to go back and forth. Just edit 1 digit.
15.6. Insert the four NS records. Note the “Add” button at the side to add lines if you need. Next, click save.
***Also, case dependent, you might get a pop up noting you need to disable the DNSSEC. It might delay the process a bit, but did not delay it for me whenever I tried… In essence, it’ll be a matter of seconds/minutes until you could already write in your browser your domain-name and get to your website.
Part 4
SSL Security Certificate
16. Time to set up SSL security certificate. You might’ve noticed that simply writing your domain name gives you an error/warning message that you are attempting to access a potentially problematic, unsecure, website. We’ll fix a SSL security certificate so it won’t happen – we want a secure and reliable website after all. (that’s the difference between http and https).

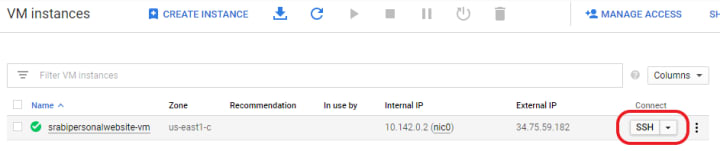
16.1. On Google Cloud Platform, go to: navigation menu -> under Compute, click Compute Engine -> VM instances.

16.2. Click the SSH.
*For the non-technical folks, take a deep breath and prepare yourself mentally. Simply follow the instructions, copy and paste the lines here. It’s easy.
16.3. Copy the following code into the virtual machine window which was opened. Do as in the picture. MAKE SURE TO MAKE CHANGES ACCORDING TO YOUR DETAILS. Bold added just to emphasize what you should edit.
sudo /opt/bitnami/letsencrypt/scripts/generate-certificate.sh -m [email protected] -d YOURDOMAINNAME.com -d www.YOURDOMAINNAME.com
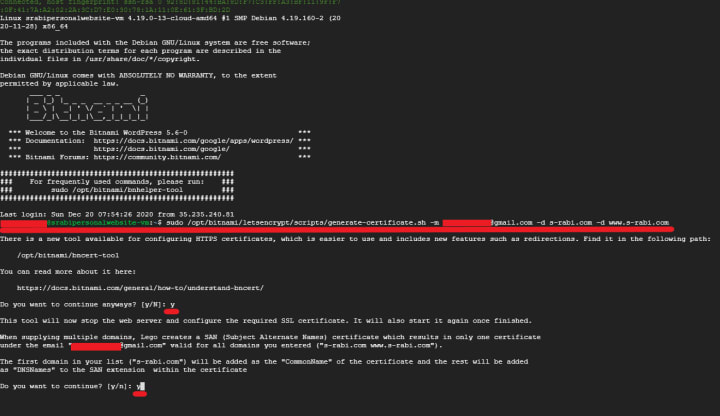
Click “Enter”.
You’ll be asked if you wish to continue. Click “y” (Yes) and Enter.
You’ll then be asked if you accept the TOS (Terms of Service). Again, click “Y” and Enter.

After receiving the “Congratulations” message, we’re asked if we wish to set a renewal of the SSL certification. We do want it to renew.
So “Y”, we do want to proceed. And click Enter.
A green code line will appear. In it, paste the following and click Enter.
sudo nano /opt/bitnami/apache2/conf/bitnami/bitnami.conf
We’ll get this and we’ll want to make space in order to insert code lines right where the red arrow points.
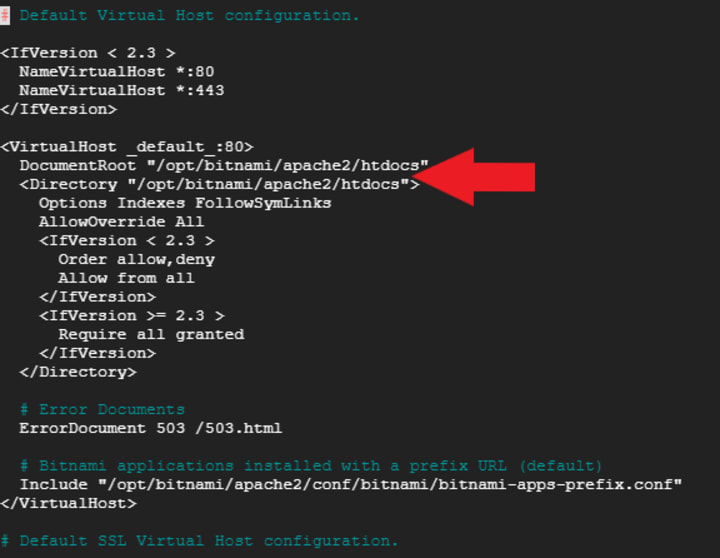
Tip: move with your keyboard arrows, not with your mouse-cursor. Get to the end of the code line and then press enter (once) in order to make space for the lines of code.
Copy the lines below (*make sure you write your own domain name there! The bold part):
RewriteEngine On
RewriteCond %{HTTPS} !=on
RewriteRule ^/(.*) https://www.s-rabi.com/$1 [R,L]
Paste the lines. You may add 2x space behind each line to move it from the left to the right as in the picture.

Then do CTRL X in order to exit this window. A new line below will appear asking if you wish to save the changes. Naturally, we do. So we click “y” (yes). Then press Enter.
That’s it! It’s saved!
We then just restart the apache server to ensure all of the changes we did take effect. So copy the following code:
sudo /opt/bitnami/ctlscript.sh restart apache
Paste it and press Enter.

Now just write “exit” and press Enter in order to exit and close the window.
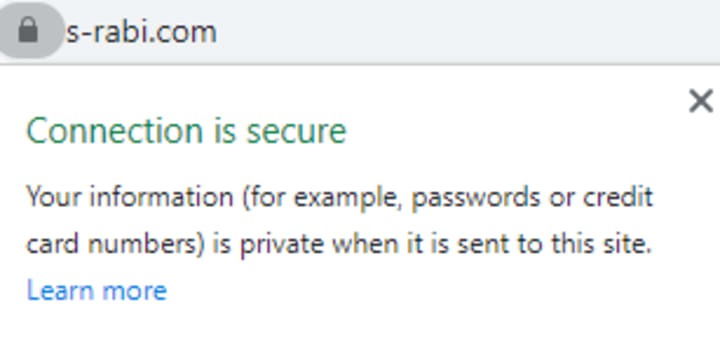
Your domain should now be secure, HTTPS (you might need to refresh).
Part 5
Billing Alerts
17. In order to set up billing alerts, so you can feel relaxed money-wise, go to the navigation menu and click Billing.
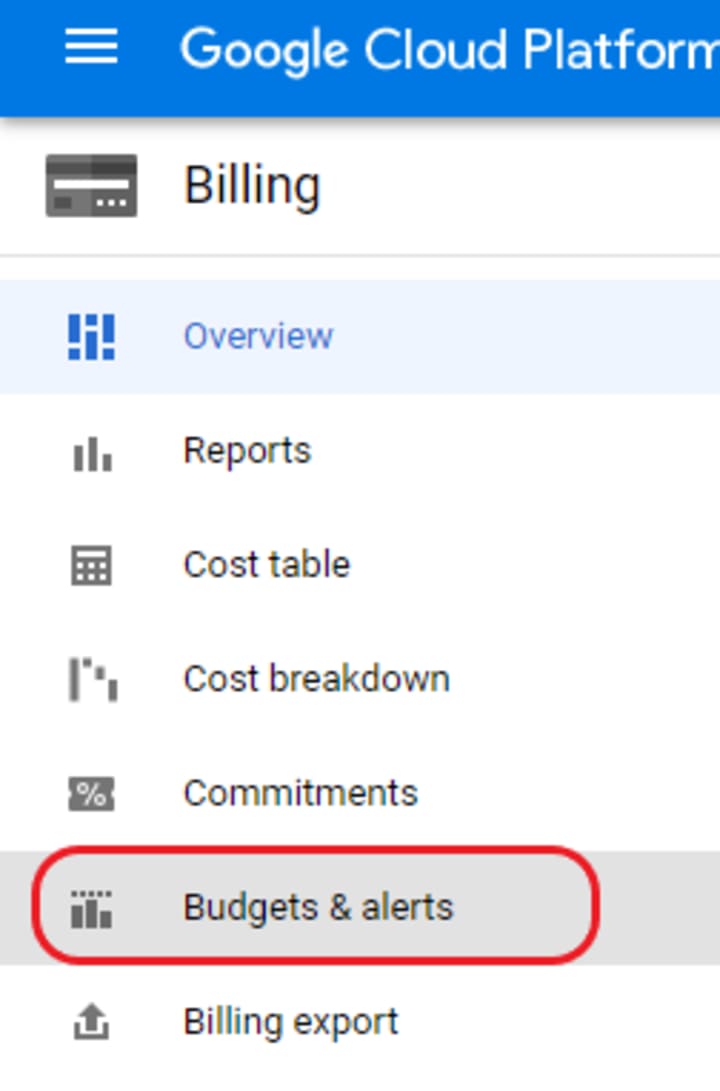
Click the “Budgets & alerts”, then click the “create budget” button.
In filling the details, simply make sure you mark “All services” under “Services”. Click the Next button.
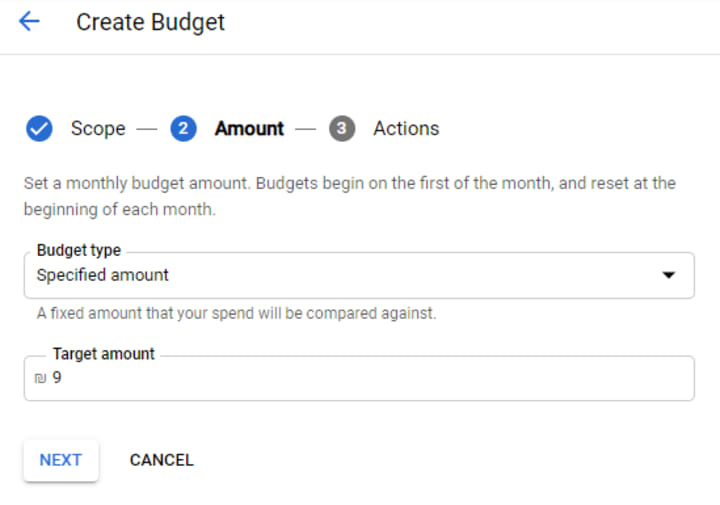
You’ll then be asked what’s your target amount. This is a decision I suggest making based on what you are interested in doing with this website and the alternatives you face.
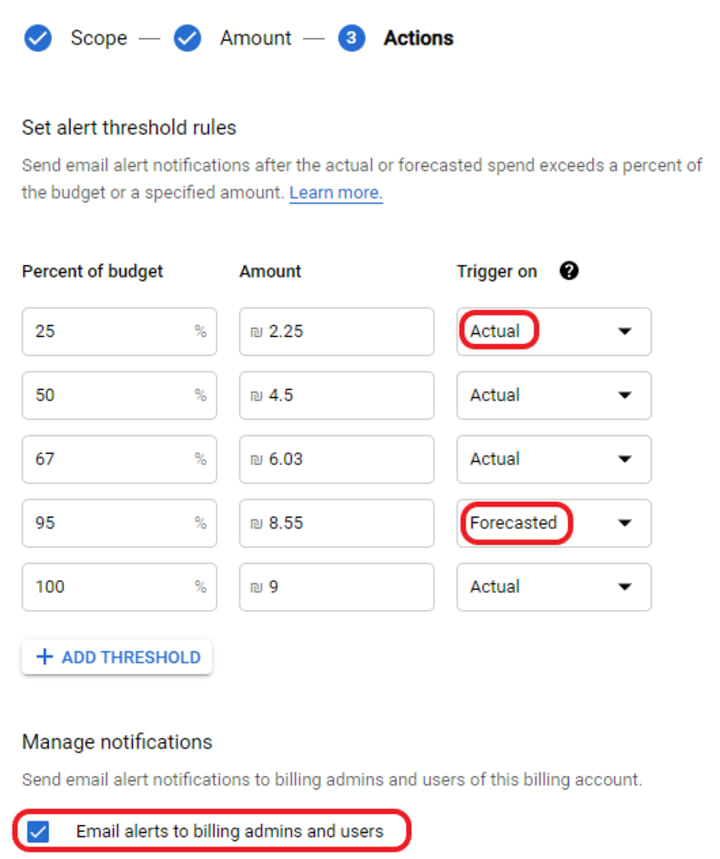
Then simply choose what sort of alerts about the billing you wish to receive via e-mail. As shown in the picture, you choose: (1) at what percent of the budget to receive the alert (it shows you the amount); (2) if the e-mail will be sent to alert you when the billing actually reached this sum or if it is forecasted, expected, to reach this sum; and (3) add another alert if you wish (click the “ADD THRESHOLD”).
Make sure that under the “manage notifications”, the “Email alerts to billing admins and users” is marked so you’d actually have e-mail notifications/alerts sent to you.
Finally, click the Finish button.
Part 6
Removing the Bitnami Mark and Other WordPress Recommendations
18. Removing the Bitnami mark - You might’ve noticed the Bitnami mark at the bottom right corner of your website. If you wish, follow the next steps in order to remove it.
18.1. Go to the Navigation Menu on Google Cloud Platform -> Compute Engine -> VM instances.
18.2. Click the SSH like before in order to open the code area of the virtual machine.
sudo /opt/bitnami/apps/wordpress/bnconfig --disable_banner 1
Press enter.
sudo /opt/bitnami/ctlscript.sh restart apache
Press enter.
Once done, write ‘exit’ and press enter to exit.

19. Creating Your WordPress Website
Currently, the website is a default template. If you are familiar with WordPress, you are well aware of your options how to build it or even better, just import a design you already have, use and like.
Remember, Google and YouTube are there to help.
I’ve downloaded Bitnami software in order to create my WordPress website on my own computer. Here is the YouTube video I watched: https://www.youtube.com/watch?v=wWVbiGc6XKk
I used this plugin to download the files from the offline website I’ve built and to pass it to the online one: https://www.youtube.com/watch?v=9pn7BaKqG-E
That's it. I hope the entire process was clear and went smooth for you!
About the Creator
Shahaf Rabi
Research Analyst & Political Scientist.
Twitter: @SHF_Rabi
Personal website: www.s-rabi.com
Keep reading
More stories from Shahaf Rabi and writers in 01 and other communities.
Interests and Bullets: Mossad Killed Al Qaeda Leader al-Masri for the US in Tehran
The New York Times broke with the story, revealing the killing of Abu Muhammad al-Masri, the second most highly ranked leader in Al Qaeda. According to the NYT, Israel carried out this targeted killing for, upon the request of, the United States of America. Both countries had interests in killing him. But here are some unintuitive things worthy of consideration.
By Shahaf Rabi3 years ago in The Swamp
Pop Goes the Fashion: The Dramatic Influence of Pop Culture on Style
The Perfect Blend of Drama and Humor Picture this: you're scrolling through Instagram and come across a photo of your favorite celebrity wearing a bold, quirky outfit that screams individuality. Suddenly, you find yourself itching to replicate that look, to capture that same essence of coolness. This, my friends, is the magic of pop culture's influence on fashion.
By Aymeric Delaplace5 days ago in 01


Comments
There are no comments for this story
Be the first to respond and start the conversation.