
How to Denoise in Premiere Pro and The Alternative Way to Denoise Easily
Noise or grain in the video is sometimes unavoidable, in this blog we will introduce how to use Premiere Pro to remove noise and three other alternative noise removal methods.


In post-production, there is usually unwanted noise in your video footage. This is referred to as image noise or grain — and it’s sometimes unavoidable. It can come from shooting in low light, using a fast ISO setting, or recording for an extended period of time. However, this kind of noise can make your footage less appealing to the eye. How do you remove image noise in Premiere Pro? There are several ways to denoise in Premiere Pro and many other alternative editing programs. Here we will explore three popular ways to do so.
Part 1: What Is Image Noise and How Does It Occur
Image noise refers to unwanted grain or texture in an image. In post-production, it’s most often seen in footage that was shot in low light or with a high ISO setting. It’s also common in footage that was overly exposed. Image noise is different from digital noise, which is a byproduct of the computer. Let’s say you were shooting in a dark room with a fast ISO setting, such as 800. When you take a photo at this setting, the camera increases the ISO to allow for more light to enter the lens and therefore enough light to properly expose the image. The result is a grainy look to the photo. In the video, this can be seen as a speckled texture on top of your footage. These specks are what we call image noise.
Part 2: How to Denoise in Premiere Pro
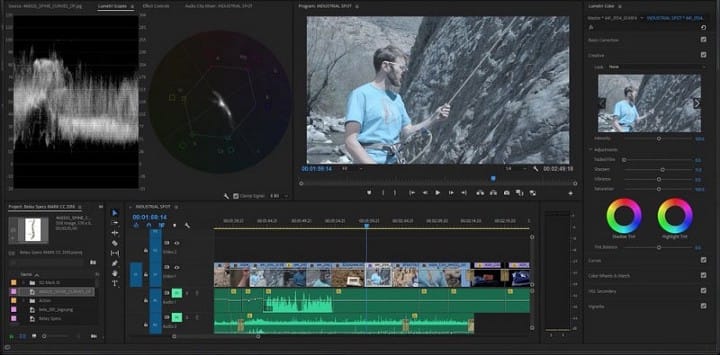
There are two ways to denoise in Premiere Pro. We’ll start with the image noise reduction effect that comes natively within the Lumetri panel.
First, open up your clip in the Lumetri panel by clicking on the tab or using the shortcut key. Select the “Image” drop-down menu and scroll down to “Noise Reduction”. You can also use the keyboard shortcut “W” to access this panel. You’ll notice that when you enable noise reduction, the “Denoise” button will be activated as well. If you want to manually adjust the settings, click on the “Denoise” button to open the denoising controls. When denoising your image, you don’t want the effect to be too noticeable. It’s important to use noise reduction sparingly. Premiere Pro recommends starting with a setting of “30”. You can increase or decrease the amount of noise reduction by clicking on the slider or inputting a specific amount in the box. Once you’ve applied the denoising effect to your clip, take a look at your image to see if you need to adjust the settings.
Part 3: Using Denoiser with Lumetri
If you want more control over the settings, you can use the native denoising effect.
To apply this to your clip, select the clip in the timeline and go to “Effect Controls”. Now select “Denoise” from the drop-down menu and click on “Apply”. Denoising can take a few seconds to process. You don’t have to apply the effect to the entire clip, either. You can apply the denoising effect to just a section of the clip. Keep in mind that denoising your entire clip will make it look cleaner, but it will also make the blacks in your image less dark. If you’re applying denoising to just a certain part of the scene, like a group of people, make sure to zoom in so that you can manually select the area you want to apply the effect to.
Part 4: Other Ways to Denoise in Premiere Pro
If you’d like to use a third-party denoising plugin, there are a few options. Here’s a look at the most popular denoising plugins.
Neat Video is a noise reduction tool for Premiere Pro. Once you’ve installed the software, open Premiere Pro and select your footage. Then, select “Effects” and click “Filter”. In the drop-down menu, select Neat Video. Here you can adjust the noise reduction and see what it looks like in real-time as you make adjustments. Since Neat Video is a plug-in, it’s best used when you have a specific scene that needs noise reduction. Unlike other noise reduction methods, Neat Video uses artificial intelligence to determine which areas of your footage need smoothing. This makes it ideal for removing noise from an entire video. While this method does require an additional plug-in, it does produce better results than simply adjusting the sliders.

Part 5: Alternative Way to Denoise in Other Program
If you’re looking for an easier-to-use alternative to Premiere Pro noise reduction, you can try using AI tools.
AVCLabs Video Enhancer AI is a great option that can save you time and hassle. Based on the most advanced AI noise reduction technology, AVCLabs Video Enhancer AI provided a dedicated Video Noise Removal model that enables you to denoise the old TV series, movies, home videos, surveillance videos, and so on, and ensure the preservation of texture quality and details as much as possible, leading to better visual experiences.
Step 1: Install and Launch AVCLabs Video Enhancer AI
Download the setup file of AVCLabs Video Enhancer AI, then click to launch the setup file. When setup is preparing to install AVCLabs Video Enhancer AI, please wait in patience that it will take a few minutes to download the additional files. After installation, AVCLabs Video Enhancer AI will be launched automatically.
Step 2: Add the Noisy Video to AVCLabs Video Enhancer AI
Just click the “Browse” button to import your noisy footage to the program.
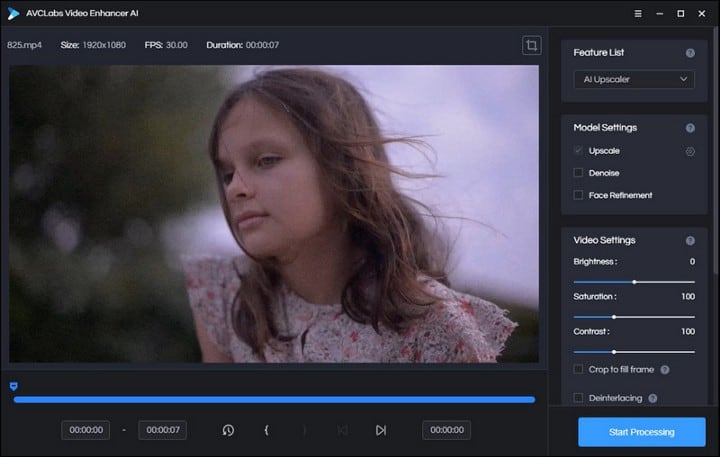
Step 3: Choose the AI Model and Resolution
On the right panel of AVCLabs Video Enhancer AI, you can choose the AI Upscaler and turn on Denoise. Then you can choose the output video resolution to 720p, 1080p, 2K, QXGA, Quad HD, WQXGA, UHD, 4K, or 8K.
Step 4: Trim Your Footage
If you want to delete the unnecessary part from your footage, you can trim it frame by frame by inputting the start and end frames on the bottom of AVCLabs Video Enhancer AI.
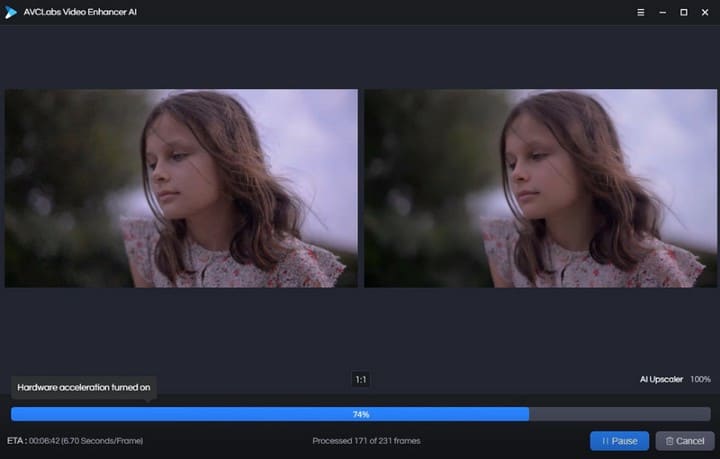
Step 5: Start Denoising Video
After everything is ready, you can go to click the “Start Processing” button to start the denoising.
Conclusion
Image noise can make your footage less appealing to the eye. How do you remove it? There are several ways to denoise in Premiere Pro and many other editing programs. The first option would be to use the native denoising effect that comes with Premiere Pro, and we’ve shown you two of the best methods in Premiere Pro. If you don’t feel comfortable using the native denoising effect or if you want an easier way to denoise your footage, then AVCLabs Video Enhancer AI is a great alternative.
About the Creator
Chloe Huang
Dedicated to sharing a variety of useful technical tips~
Keep reading
More stories from Chloe Huang and writers in 01 and other communities.
Face Enhance AI: Restore Extremely Blurry Faces in Videos
Unless you’re using a very high-end camera or shooting in an incredibly well-lit environment, it’s almost inevitable that your video will be plagued by some form of a blur. Whether it’s the subject of your video, faces, or objects in the background, blurred details are usually a sign that something has gone wrong. Fortunately, the AI-powered Face Enhance feature is able to fix common annoyances with faces in videos. This software not only detects faces but also identifies their characteristics to tackle them. This is done using different types of AI: computer vision, natural language processing (NLP), and convolutional neural networks (CNN). That’s how the new Face Enhance feature works.
By Chloe Huang2 years ago in 01


Comments
There are no comments for this story
Be the first to respond and start the conversation.