

This project makes it easy for you to experiment with the burgeoning IoT technology, while you up-cycle some old tech and also get to experiment with some basic code.
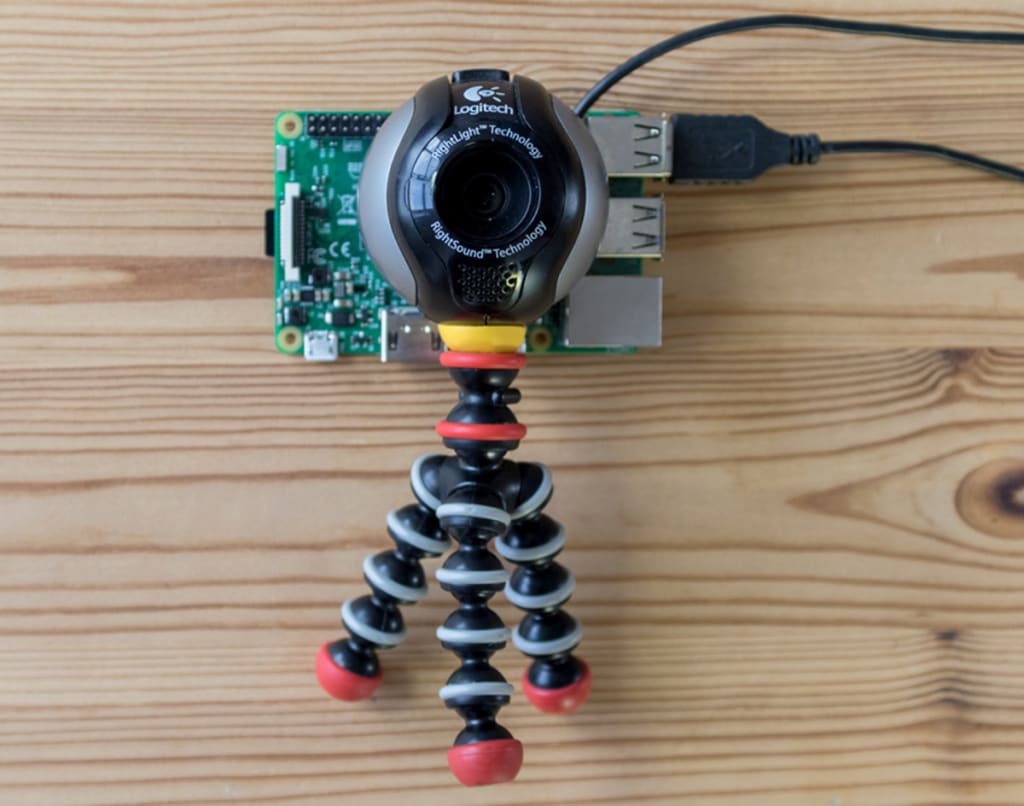
Stage 1 - Build the camera
WHAT YOU'LL NEED TO DO THIS PROJECT
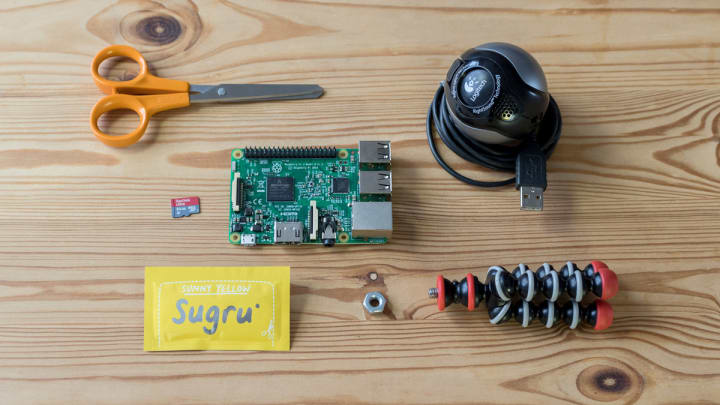
- a Raspberry Pi™ (a clever little, low-cost computer that plugs into any monitor or TV)
- an old webcam
- a Joby™ tripod
- a nut (a standard 1/4” - 20 nut available from most hardware stores)
- 1 SD card
- 1 pack of Sugru
- scissors
STEP 1 — MOUNT THE TRIPOD NUT TO THE CAMERA
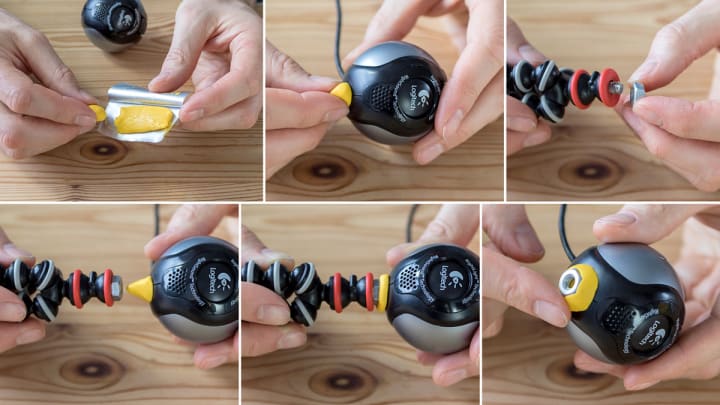
- Use just 1/5 of the pack to mount the tripped nut to the base of the camera
- Roll into a ball, press firmly onto the base and mould into a pyramid shape
- Put the nut onto your tripod (keep it nice and loose) then press slowly and firmly into the Sugru
- Press the Sugru in and rub smooth
- Gently unscrew the tripod
STEP 2 — MOUNT THE CAMERA TO THE RASPBERRY PI

- Roll the rest of the Sugru into a ball
- Press it onto the back of the camera making sure that the cable is twisted in the best direction
- Mould into a pyramid shape
- Press the camera slowly and firmly onto the Raspberry Pi
- Press the sugru in and rub gently where you can reach it
And then just wait 24 hours for the Sugru to cure.
Step 3 — Wait for 24 hours for Sugru to cure
Stage 2 — Set up the code to run the Raspberry Pi
To transform your new camera into an IoT camera, just download the customised Open Source Code we’ve built for you and follow these steps. This will run in your browser, over your WI-FI and on any smartphone or desktop computer. No apps, no subscriptions, just some seriously good old-fashioned technology.
STEP 1 — DOWNLOAD THE SD CARD IMAGE
We have made the camera setup really plug and play for you by creating a Raspberry Pi “image”. This is essentially a snapshot of a whole operating system, along with its files, settings and installed programs that can perfectly capture images from your webcam and serve them up to your phone, tablet or computer. You need to download this image file and clone it into an SD card. Since the file is a snapshot of an SD card, it’s quite large, measuring up at 16GB. Make sure you have space for it! You can delete it afterwards. Download it here.
STEP 2 — CLONE IMAGE TO SD CARD
Now, once you’ve downloaded the Raspberry Pi image, you need to clone it into an SD card. This operation is wildly different and depends on the operating system your computer is running. This is probably going to be the trickiest part of the operation, but don’t be scared! The wonderful folks at the Raspberry Pi Organisation have made a great easy-to-follow guide that shows you how to take your image file and burn it onto an SD card. Head on over here to master image burning! Look at the section titled “Writing an image to the SD card”.
STEP 3 - ADD IN YOUR WIFI DETAILS
Once you’ve written the image to your SD card, you should see two SD cards mounted on your computer - “boot” and “RECOVERY”. Go ahead and open boot. Right at the end of the file list, you’ll find a file called “wifi.conf”. Open that up in a text editor (TextEdit if you’re on a Mac, or Notepad if you’re on Windows). Here’s where you add in your WiFi details so that the Pi knows how to connect to your home network. Swap out “YourWiFiNameHere” with whatever your WiFi network name is, and “YourWiFiPasswordHere” with your - you guessed it - WiFi password! Save and close the file, and eject both SD cards from your system. You can now remove it from your computer.
STEP 4 - CONNECT IT ALL UP
Congratulations! You’re through to the last and most fun part. Put the SD card into the Raspberry Pi. Connect up your webcam to one of the USB ports on the Pi. Make sure that everything’s nicely mounted and ready to go.
STEP 5 - POWER IT UP AND TEST
Finally, go ahead and plug in the microUSB cable that will provide the Pi with power! Your Raspberry Pi IoT Camera will start booting up. You’ll see some rapid light blinking, which is signalling that the Pi is going through its startup routine. After about a minute or two, open a web browser on your phone, tablet or computer. Navigate to http://iotcamera.local:8081. You should be able to see a live stream from your camera.
Content owned by: Infomance
About the Creator
Creating the Perfect Oktoberfest Party at Home
Wanting to attend the Oktoberfest doesn’t have to cost you a plane ticket to Munich, because you can even arrange that party in your very own home! What could be more fun than having your close family and friends with you, drinking, dancing, eating delicious Bavarian foods, and playing games while dressed in Dirndl dresses and Lederhosen men's outfits?
By Sarah Michelle4 days ago in 01
The Last Countdown
Diane sat in her vehicle, the downpour pattering on the windshield like a fretful metronome. The ticking of the dashboard clock synchronized with her pulse, each passing second a horrible update that she was using up all available time. White noise filled the vehicle, including the engine's constant hum, the distant drone of traffic, and the gentle hiss of rain hitting the windows. But Diane was concentrating on the courthouse across the street, and as she gripped the wheel, her knuckles turned white. She had not seen her son Ben in two years. He'd been just 18 when a terrible choice with some unacceptable group landed him in prison, and presently he was at long last being delivered. During the trial, Diane had been present and had to put up with lawyers who had told her that he would "bounce back." However, the truth was more extreme. She was aware that his time in prison had taken its toll and that he had lost some of his spirit with each passing day. Presently, with just 53 seconds to go, Diane's heart hustled quicker. She looked at the town hall, attempting to look through the downpour streaked windshield, her breath hazing up the glass. Numerous stories of hopelessness and despair had been told in the old building, and the clock tower there seemed to make fun of her anxiety. In an effort to get a clear view of the steps from which Ben would soon emerge, she wiped away the fog. Her surroundings continued to move at an indifferent pace. She heard a canine yapping somewhere out there, saw walkers clustering under umbrellas, and vehicles passing by without a subsequent look. However, for Diane, the universe had condensed to a single time and place. Everything was contingent on what would transpire in the following few seconds. Her throat tightened when the doors to the courthouse opened. The downpour and her own tears blurred the figures as they began to emerge. She immediately cleaned her eyes, looking for the recognizable step and hair wave that had a place with her child. Milliseconds felt like hours, and it seemed like time was expanding and contracting simultaneously. She paused her breathing, filtering each face for a brief look at Ben's elements, trusting that jail hadn't transformed him to an extreme. Then, he was right there. Unsure of his surroundings, a young man cautiously stepped outside while glancing around in the rain. The beat of Diane's heart stopped. He had a sharper edge to him than she remembered, and he was thinner than she remembered. However, it was her Ben—him. She pushed open the vehicle entryway, not thinking often about the ticking clock or the motor actually running. She barely noticed that the rain had soaked her hair and clothes. "Ben!" she called out, her voice breaking with urgency. Her words made it to him, but the wind swept them away. Their gazes met as his head jerked upward. Time stood still as he was recognized and trusted in his gaze. Maybe the whole world had contracted to the space between them, as though all the other things failed to issue. Ben moved cautiously forward, followed by another. Each step was loaded up with vulnerability, like he was trying the ground underneath him. As she watched him approach, Diane felt her heart pound. "Mom?" he said, his voice speculative and loaded up with doubt. She didn't pause. She surged toward him, her arms outstretched, prepared to close the hole between them. At the point when they at last impacted, maybe the most recent two years dissolved away. Diane clutched her child as though she could never give up, the tears and downpour blending on her cheeks. She reenacted each and every time they had been apart, including every moment of worry and fear, every night without sleep, and every prayer for his safety. Time restarted in that embrace, but now each tick of the clock was a new moment. The aloof world went on around them, however it at this point not made a difference. Despite everything, Diane and Ben had reunited, and their bond was stronger than ever. The downpour washed away the long stretches of torment and uncertainty, leaving them with a new beginning. The last commencement had finished, and their fresh start had quite recently started.
By Hira nadeem3 days ago in 01


Comments
There are no comments for this story
Be the first to respond and start the conversation.