

Understanding Face Detection with the Viola-Jones Object Detection Cascade
For humans, distinguishing objects in an image is a straightforward task. However, for a computer program to detect specific objects from an image it can result in a difficult task. A computer needs to make use of some image features to gather intel on the objects in the image. Then train the program by some learning mechanism on these features. Finally when given a never seen before image some sort of matching/classifying needs to take place. Therefore the need for a framework is evident. One popular solution is Viola-Jones Object Detection. It is a framework developed by Paul Viola and Michael Jones. Although the framework is relatively slow to train, it can quickly detect objects accurately. Moreover, it works really well to detect human faces and can do so in real time. This makes the Viola-Jones a reliable algorithm to detect faces from live video recordings (for example webcams and security cameras).
Viola-Jones Object detection is made up of 4 stages, which are:
- Selecting Haar-like features
- Creating an integral image
- Running AdaBoost training
- Creating classifier cascades
To understand how the procedures work one must know what every step is achieving.
Step 1, Selecting Haar features. Haar features are digital image features. More specifically, they calculate image intensities, that is, light vs dark pixels. This is done by making use of a detection window, which is a specific area (usually rectangular) in an image, as can be seen in the diagram below. The sum of these windows, which is worked out by subtracting the sum of pixels under the white rectangle from sum of pixels under the black rectangle, is calculated. Finally the sections are categorized using the difference between the sums of the windows.
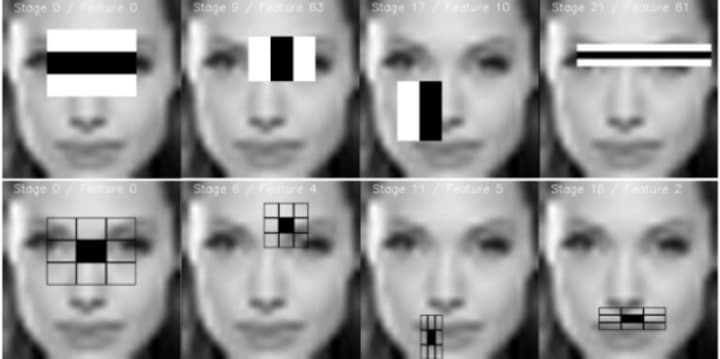
From these sections a computer can tell specific properties. For example in a face detectioning algorithm, all faces share similar attributes. Mainly, a nose, two eyes, lips, etc. Now looking at the intensities of an image of a face one can note certain characteristics, for example the nose bridge region is brighter than the eyes. A program using haar-like features can use these similar properties to classify an image efficiently. More on this later.
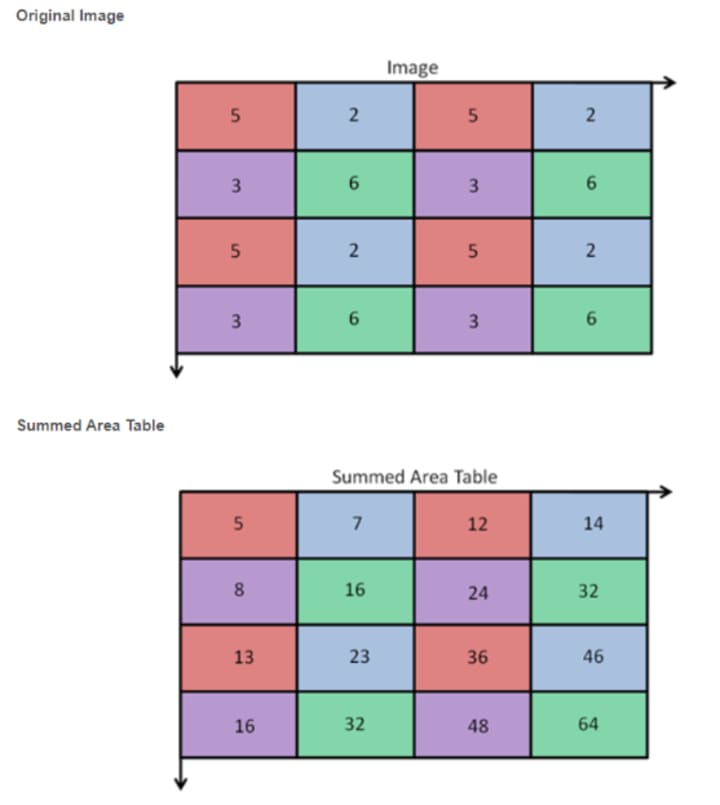
Step 2, Creating an integral image. An integral image gives a fast and simple way to calculate the value of any haar-like feature. This is done by making use of the Summed Area Table. The value for location (x, y) on the integral image is the sum of the pixels above and to the left of the (x, y) on the original image plus itself. For example, from below to calculate the (2,2) = 16: 5+2+3+6 = 16.
After constructing the integral image, it is used to efficiently calculate the sum of dark/light rectangular regions in Viola-Jones Algorithm. This is done by summing up (see diagram below) the corner pixels of the wanted window.
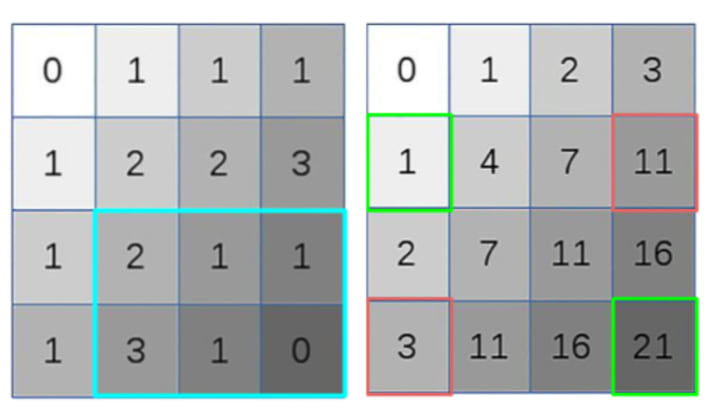
To get the sum of the blue rectangle, just add the green values and subtract the red values in the integral image. 1+21-11-3 = 8.
Step 3, Running AdaBoost training. The AdaBoost, that is Adaptive Boosting algorithm, is a learn and predict ML model that identifies the best features. It does this through information on the training dataset. The algorithm sets a minimum threshold for determining a useful feature. The output is a classifier. This ‘strong’ classifier is made up of many ‘weak’ classifiers. To find these weak classifiers the algorithm runs for N iterations. When choosing N, one must be careful to not overtrain the classifier. This is done when the model predicts training examples well but cannot predict never seen before data accurately. To avoid overtraining N should not be a high number.
Step 4, creating classifier Cascades. Above it was noted that a strong classifier is made up from many weak classifiers. Here, this strong classifier is turned into a cascade. Having many stages, each stage consists of a weak classifier. By having this chain of stages, it can effectively test our image/subimage. This is since the task of every stage is to determine if in the given window there is not a face or maybe there is a face. The output will always be no or maybe. If ‘no’, the window is discarded and it does not need to go through further levels. If ‘maybe’, the next classifier is called and the process is repeated until the last stage is finished. This is a much more cost effective and a fast procedure since many windows will be quickly discarded.
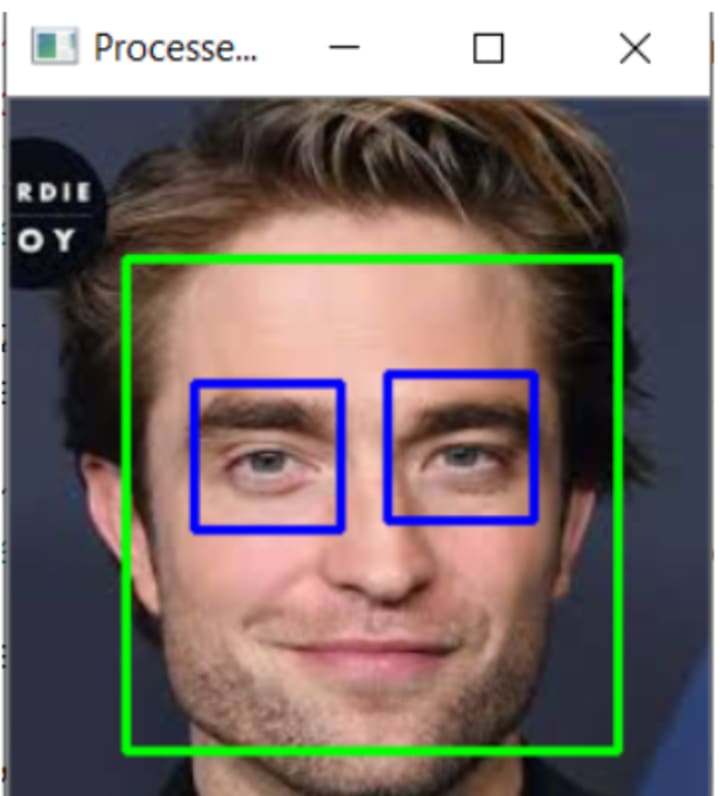
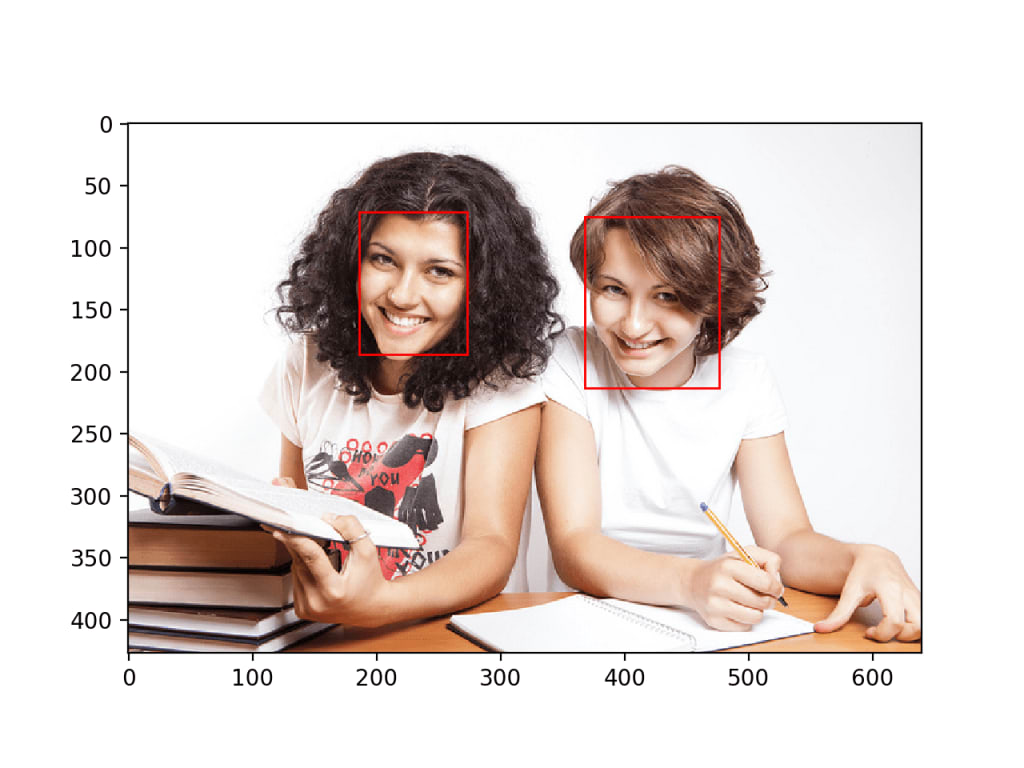
To conclude, as seen from the above image using Viola-Jones object detection is highly accurate to detect faces. The above 4 steps contribute in making the process of object detection cost efficient and accurate. Hence Viola-Jones is used for detecting faces in live footage. In the following sections, results from using a Viola-Jones framework will be discussed.
About the Creator
Andrew D
Student at University, motivated to learn and improve my skills so as to achieve my maximum potential.
Best AI Apps for iOS [Trending]
It wouldn’t be wrong to say that the 21st century has been and will be the AI century, as AI has taken the world by storm. This groundbreaking technology has found its existence in almost every industry and we as users feel its presence generally through our smartphones.
By keith laurance4 days ago in 01


Comments
There are no comments for this story
Be the first to respond and start the conversation.