


In this tutorial, we will configure python and TensorFlow so it works perfectly in windows 10. At the end of this tutorial, you will have TensorFlow working perfectly.
This is part 2 of how to build an object detection classifier using TensorFlow, if you haven’t seen part 1 here is the link below.

Python for Deep Learning
Python 3.x is the programming language that will be used for this class. Python, as a programming language, has the widest support for deep learning. The three most popular frameworks for deep learning in Python are:
TensorFlow (Google)
MXNet (Amazon)
CNTK (Microsoft)
Installing Python and TensorFlow
The first step is to install the latest version of MiniConda Python. As of January 2020, 3.7 is the latest version of Python 3. I recommend using the MiniConda (Anaconda) release of Python, as it already includes many of the data science related packages that are needed by this class. Anaconda directly supports Windows, Mac, and Linux. Miniconda is the minimal set of features from the extensive Anaconda Python distribution. Download Miniconda from the following URL:
Installing Jupyter
Install Jupyter into your base Python environment. In the next section, we will create a sub-environment that holds precisely the software we need. However, it is essential to have a Jupyter notebook installed in your base Python environment. It is easy to install Jupyter notebooks with the following command:
conda install -y jupyter
Download Repository
To make everyone’s life easier I create a GitHub repository with all the files that you need. It includes all of the TensorFlow models and all the python scripts to resize, train and test your classifier with images, video, or webcam.
Clone the repository or download it as a zip file.
Rename the folder
tensorflow_py-master
to:
models
Create Environment
A conda environment is a directory that contains a specific collection of conda packages that you have installed. For example, you may have one environment with NumPy 1.7 and its dependencies, and another environment with NumPy 1.6 for legacy testing. If you change one environment, your other environments are not affected. You can easily activate or deactivate environments, which is how you switch between them. You can also share your environment with someone by giving them a copy of your environment.yaml file.
We will create an environment to hold TensorFlow. If you see inside the models folder there is a document called
tensorflow-gpu.yml
If you want, you can open the document with a notepad and see its content. It includes most of the libraries that we need to create the environment. So, first, we need to locate that file using the following command.
dir *.yml
If you are in the proper folder you will see the following result, if not, then you are in the wrong folder or you have changed the extension yml to another one

Now, let’s proceed with creating our environment with the following command.
conda env create -v -f tensorflow-gpu.yml
Once is finished, you will see the following

To activate your environment you type the following command:
conda activate tensorflowpython
To know if you are inside the environment you should see the name of the environment at the beginning of the command prompt

Installing Packages
Inside of your conda environment, you will install the following libraries that are a requirement for Tensorflow. If you see an error that says:
ERROR: Could not install packages due to an Environmenterror: Access is denied
Just run the command prompt as an Administrator
pip install -U pip
pip install tensorflow==1.15.0
conda install -c anaconda protobuf
pip install pillow
pip install lxml
pip install Cython
pip install contextlib2
pip install jupyter
pip install matplotlib
pip install pandas
pip install opencv-python
NOTE
The last version of Tensorflow is 2.1. However, for this tutorial, we will be using Tensorflow 1.15 because version 2.1 doesn’t comply in running with the python scripts that I created and it’s just a mess to make it work. So version 1.15 works and you can train your classifier with it.
Setting up the Path
This is a crucial step, if you forget to do it and get any error in the future is because Tensorflow can’t find the proper path to the following directories
models
research
slim
miniconda3-Tensorflow
The command is pretty simple, but you need to configure it on your own directory.
set PYTHONPATH=C:\Users\danny\video\models;C:\Users\danny\video\models\research\;C:\Users\danny\video\models\research\slim;C:\Users\danny\miniconda3\envs\tensorflow\Library\bin
Install Protoc
Protocol buffers are a flexible, efficient, automated mechanism for serializing structured data — think XML, but smaller, faster, and simpler. You define how you want your data to be structured once; then you can use special generated source code to easily write and read your structured data to and from a variety of data streams and using a variety of languages. You can even update your data structure without breaking deployed programs that are compiled against the “old” format.
Because of the speed, we need to install Protoc So now go to your research folder
cd C:\Users\danny\video\models\research
Inside of the research folder paste the following command:
protoc --python_out=. .\object_detection\protos\anchor_generator.proto .\object_detection\protos\argmax_matcher.proto .\object_detection\protos\bipartite_matcher.proto .\object_detection\protos\box_coder.proto .\object_detection\protos\box_predictor.proto .\object_detection\protos\eval.proto .\object_detection\protos\faster_rcnn.proto .\object_detection\protos\faster_rcnn_box_coder.proto .\object_detection\protos\grid_anchor_generator.proto .\object_detection\protos\hyperparams.proto .\object_detection\protos\image_resizer.proto .\object_detection\protos\input_reader.proto .\object_detection\protos\losses.proto .\object_detection\protos\matcher.proto .\object_detection\protos\mean_stddev_box_coder.proto .\object_detection\protos\model.proto .\object_detection\protos\optimizer.proto .\object_detection\protos\pipeline.proto .\object_detection\protos\post_processing.proto .\object_detection\protos\preprocessor.proto .\object_detection\protos\region_similarity_calculator.proto .\object_detection\protos\square_box_coder.proto .\object_detection\protos\ssd.proto .\object_detection\protos\ssd_anchor_generator.proto .\object_detection\protos\string_int_label_map.proto .\object_detection\protos\train.proto .\object_detection\protos\keypoint_box_coder.proto .\object_detection\protos\multiscale_anchor_generator.proto .\object_detection\protos\graph_rewriter.proto .\object_detection\protos\calibration.proto .\object_detection\protos\flexible_grid_anchor_generator.proto
Before we end with Protoc we need to install two more things
conda install git
pip install "git+https://github.com/philferriere/cocoapi.git#egg=pycocotools&subdirectory=PythonAPI"
To end with the Protoc we just need to build it and install it like this
python setup.py build
python setup.py install
Test Tensorflow
Finally, we can test if TensorFlow is working properly on your computer and finish the installation. To test Tensorflow we will run an example called “object_detection_tutorial.ipynb”. To run this tutorial we will use Jupiter so go to your object_detection folder
cd C:/Users/danny/video/models/research/object_detection
now run:
jupyter notebook object_detection_tutorial.ipynb
and you will see the following
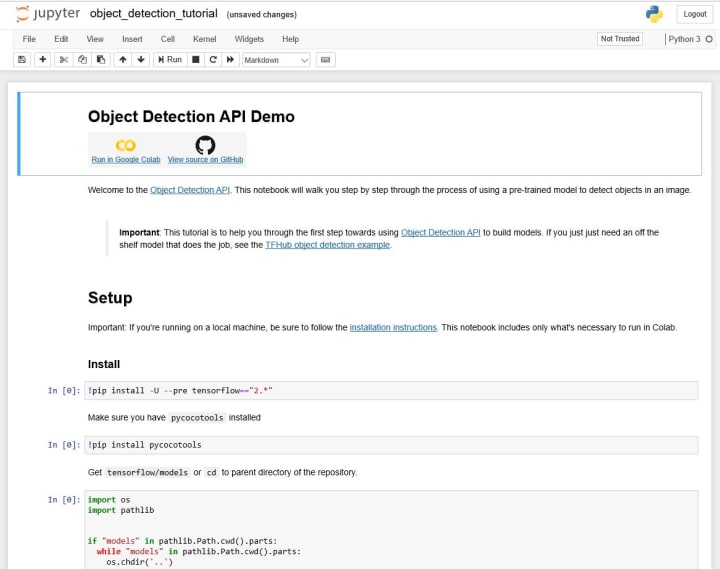
To run the full code go to Cell, and click on run all

It will compile every line of the code and leave there for a while, it’s going to take some time to compile, train, and verify the classifier.
Once the code is compiled you will see the following

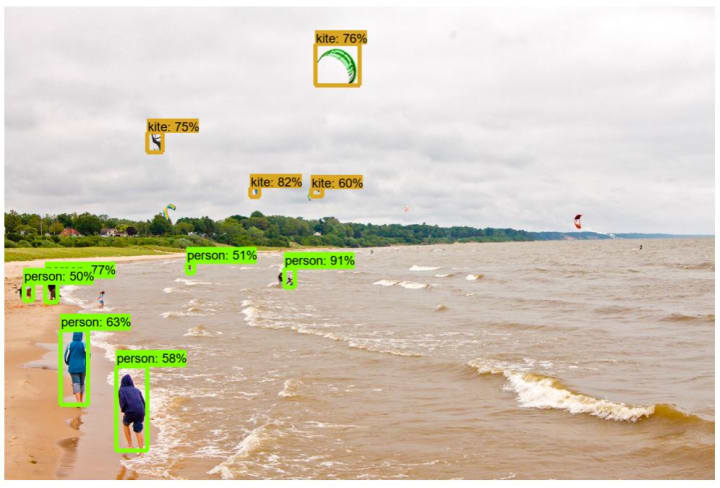
That’s it, TensorFlow is now installed and working. For the next tutorial, I will teach you how to train your own classifier and detect the object in real-time.
About the Creator
180NF
Building the world's largest nutritional database, the decentralized app for nutrition and fitness.
7 Ways to Get Free Tidal Subscriptions - Up to 6 Months
Tidal is perfect for audiophiles looking to stream genres of tracks in the best audio quality possible. This platform adopts the freemium model, allowing new users to experience 30 days of Tidal for free. However, after the trial period ends, lossless playback can only be unlocked with the purchase of a Premium subscription (HiFi or HiFi Plus). On this page, we'll go over several workable methods to get a Tidal Free Trial. On top of that, there's another workaround for how to keep Tidal Hi-Fi songs free forever!
By Whitney Brown7 days ago in 01
Vocal Bonus Leaderboard: 04/17/2024
Welcome to the weekly update of the Leaderboard! We're thrilled to showcase Vocal's most discussed stories, popular picks, and rising stars. Let's dive into this past week's standout contributors and their remarkable achievements.
By Vocal Team7 days ago in Resources


Comments
There are no comments for this story
Be the first to respond and start the conversation.