

Sewing can be lots of fun once you get past the setup phase of the equipment. Learning how to thread a machine without any instructions can be a frustrating adventure.
So I got my new sewing machine, opened up and .... was completely overwhelmed. I had no idea how to even thread the machine, let alone start my first project. Looking back, i really should have learned what all the lever and knob do first because that would have really helped when trying to thread it for the first time. So, in an attempt to help others in the same situation. Here is something that I hope you find to be very useful: How to Thread a Sewing Machine Correctly .
Following these steps can help you to have a successful experience with most sewing machines. Always refer to your owner’s manual for any specific questions about the model you own.
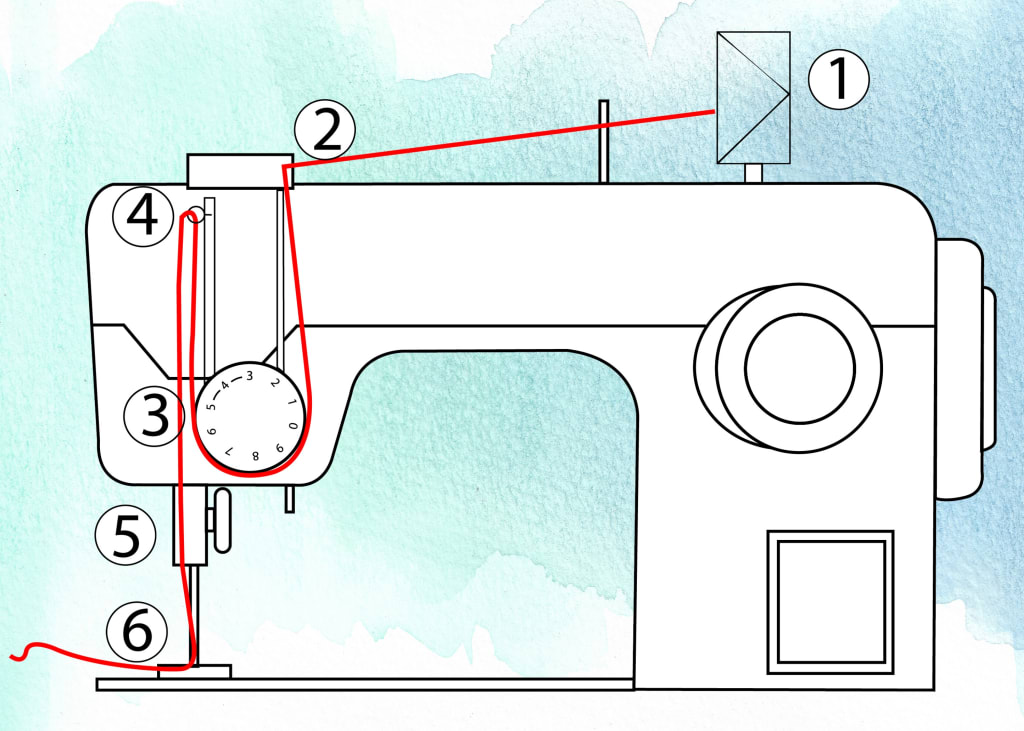
1. Place the thread on the spool of the machine.
Put the stopper or cap on if you have one. Then put the side of the thread with the small cut to the bottom or back to prevent it from hanging up.
2. Allow the thread to unwind so that it can go through the exterior guide.
Some machines have a large hoop or notch to use for the guide. Most models use a small knob that looks more like a button.
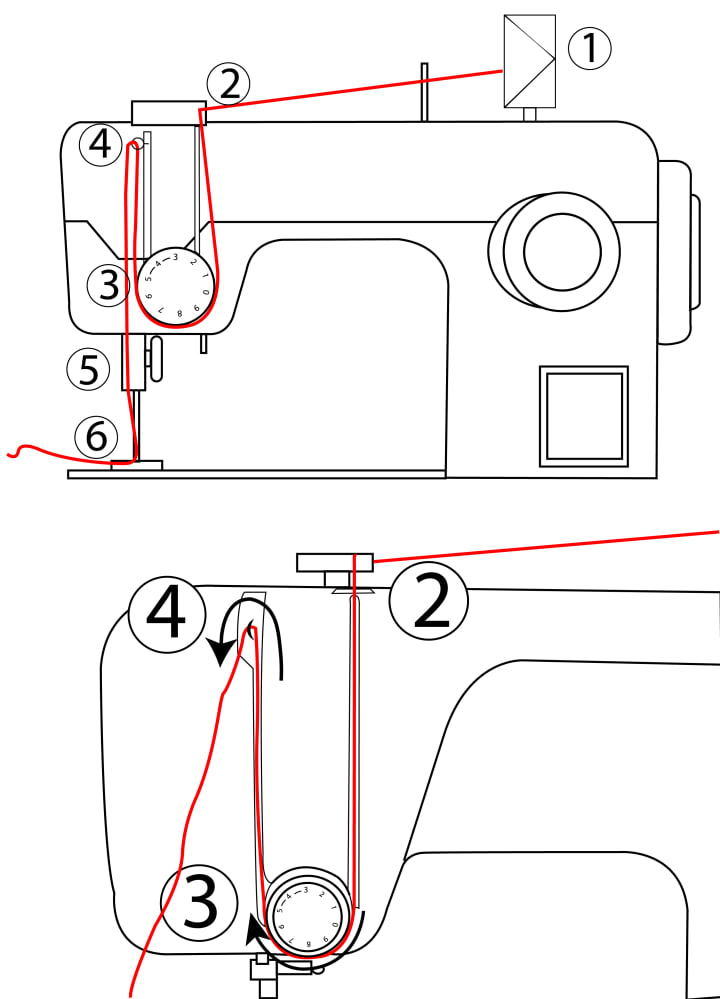
3. Run the thread around the tension knob.
You need to pull the thread toward you during this step. Loop it carefully around the tension discs that are directly below the exterior guide.
4. Pull it up to the next thread guide.
A second thread guide sits to the left and slightly below the first one. After running it around the tension knob, you must bring it up to a lever with an eyelet. This process causes the string to create a U-shaped path.
5. Bring it to the needle.
You now get to bring the thread to the needle. Several holding hooks may be on your sewing machine to guide it to this location. You’ll need to follow all of them to complete this step successfully.
6. Thread your needle from the front to the back.
This step tends to be the most challenging. It helps to cut the thread with sharp scissors. You might also moisten it since a wet string is easier to manage as you move from the front to the back.
7. Insert the bobbin.
Each machine has a different process to follow based on the bobbin type you use. Most have it inserted from the front or the top, but a few have a removable case. Some even have you drop it straight down to a fixed spot. Turn the big wheel on the side of the machine toward you so that the needle hooks the top and bottom thread. You may need tweezers or pins to grab it.
8. Pull both threads to the back.
You should have the thread run freely when pulled. If that is not the case, retrace your previous steps to ensure everything is routed correctly.
Now you’re ready to test your new sewing machine!
If you are nervous, then the first thing to do is to take a piece of scrap fabric and just practice stitching in a straight line. If you are feeling antsy and ready to start your first project, here are a couple of recommendations just below.
I hope this article helped you start a very rewarding hobby. If you loved what you read than check out my other articles here on Vocal. If you really loved what you read send a 1 time tip, the support will make sure that more articles like this are coming your way!
About the Creator
Nancy D
Facebook @NancyDBlogging
Twitter @BlogsNancy
Skip Laurels: The Evergreen Shrubs for Your Garden
Title: Skip Laurels: The Evergreen Solution for Your Garden Introduction: In the world of gardening, finding the perfect shrub that combines beauty, versatility, and resilience can be a challenge. Enter Skip Laurels, an evergreen shrub variety that has become a favorite among gardeners for its lush foliage, easy maintenance, and adaptability to various growing conditions. In this article, we'll delve into the world of Skip Laurels, exploring their characteristics, benefits, and how you can incorporate them into your garden landscape.
By Kavya Organic Garden3 days ago in Lifehack
The Top 6 Benefits of Invisible Teeth Braces
In the realm of orthodontic treatment, clear aligners have emerged as a revolutionary alternative to traditional braces. This innovative approach addresses several shortcomings associated with conventional orthodontic methods, presenting a solution to common challenges faced by patients seeking teeth alignment.
By Rupesh Kumar about 19 hours ago in Lifehack


Comments
There are no comments for this story
Be the first to respond and start the conversation.