

Rive is a real-time interactive design tool that allows you to design, animate, and immediately integrate your assets into any platform.
There are two core parts to Rive: the editor and the runtimes. The editor is where you create your designs and animate them. The runtimes are open source libraries that allow you to load and manipulate your Rive files in Swift, Flutter, Android, JavaScript/WebGL, React, C++, and more (and we're working on more).
For our splash screen, we will be using Flare to create it. Flare is a powerful animation tool that you can use for both UI and character design in apps and games. By using Flare, you can easily improve the user experience of your mobile application by adding fluid animations that your users can interact with.
In this tutorial, you'll learn how to:
1. Create an animation using Flare
2. Export your animation
3. Code your animation inside Flutter
4. Compile the animation in your phone
IF you want to see the full video tutorial instead of reading, I will leave the link down below
Creating a Design
The first thing you need is to create a design that you love and want to animate. I recommend using Adobe Illustrator for this task because the idea is to have a vectorized image. But for the new users starting this world, what is a vectorized image?
"Vectorizing" is the process of converting a pixel-based image (ex. JPEG and PNG files) into a vector-based version (SVG, EPS, and EMF files), with every facet of the image treated as a line or shape. This includes any text, symbols, and other tiny details. With a quality vectorization, the two image formats should be indistinguishable to the naked eye.
In other words, when we enlarge or zoom in on a raster image, we start to see pixels and artifacts, so this image style cannot be used for large-scale projects. On the other hand, vectors are composed of mathematical shapes and lines, which can be expanded (or contracted) thousands of times without running into problems. This makes vector graphics much more versatile than raster graphics.
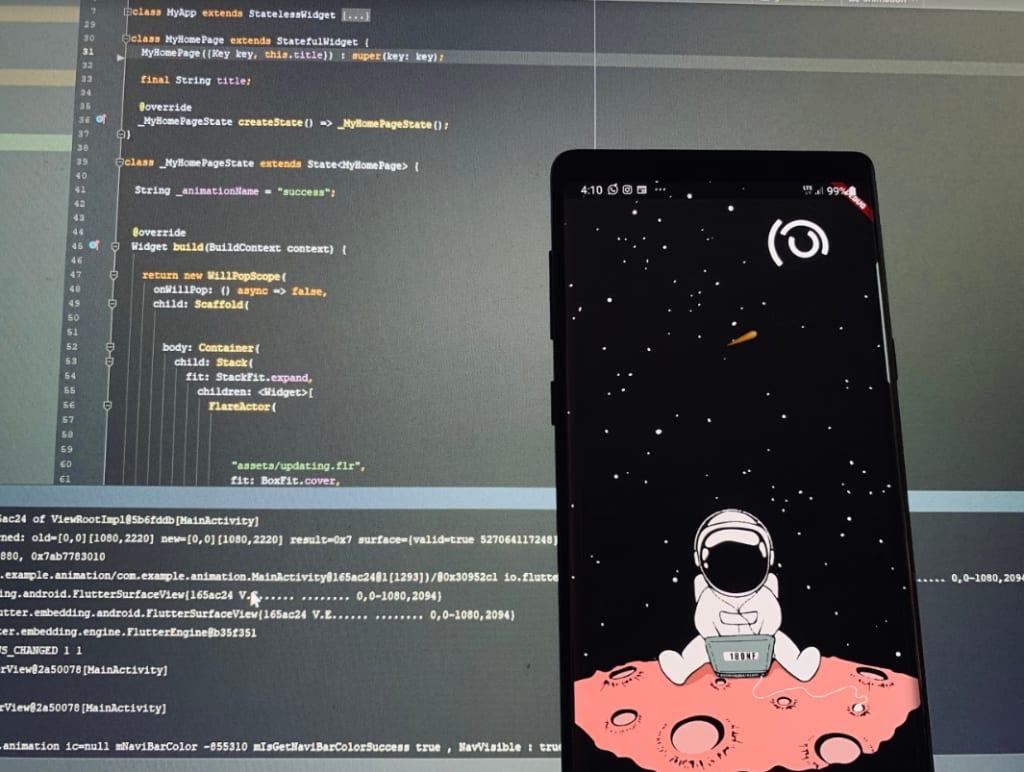
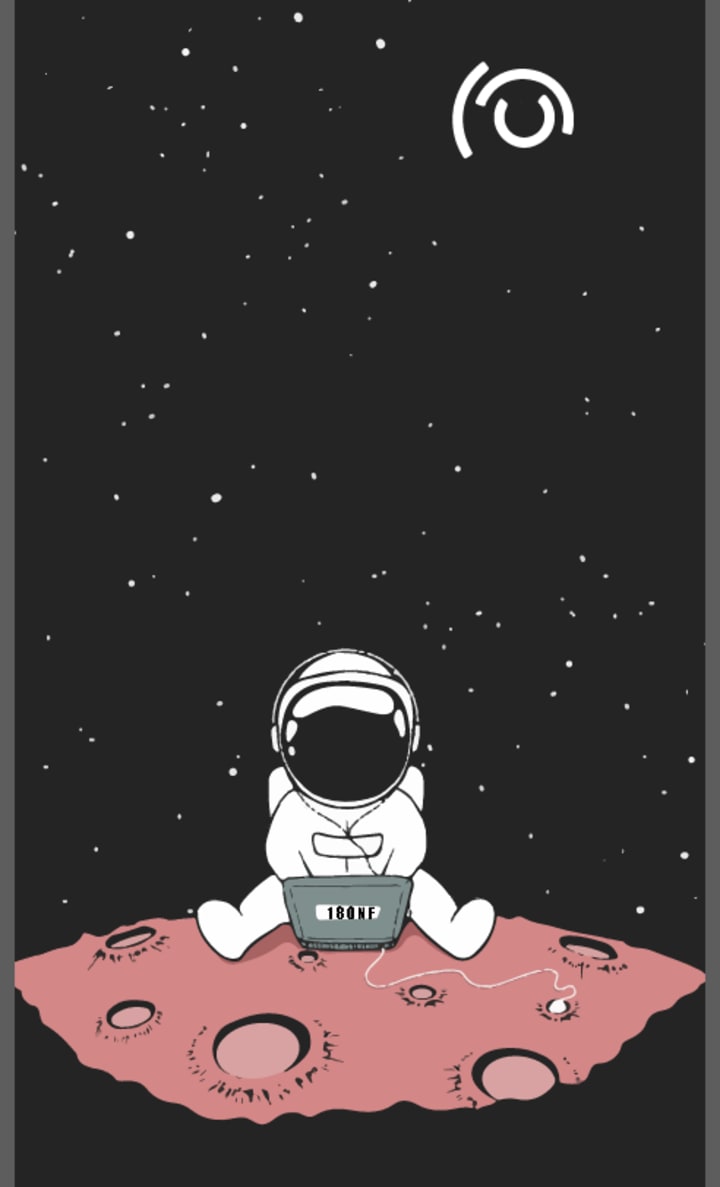
Once you have your design ready export it in SVG file so it can be imported easily in Flare. Our design is the following
Animating using Flare
By using flare you have the basic motion of animations, but if you combined them correctly you can create amazing stuff.
So the basics are:
- Translate
- Rotate
- Resize
- Pose
- Opacity
- Fill
- Paths
With all of those options, there is truly no limitation in what you can create. I know it sounds very basic and you are still wondering but how? Well, for this part is better to explain if you watch my video so you can understand better and come back for the rest of the tutorial.
Coding the animation in Flutter
The first thing we need to do once our app is created will be to update the "pubspec.yaml" file to include the packages for Flare. To do this, simply find the latest version here and reference it in the dependencies below. Once you have the version set, make sure to click the "Packages get" button in blue to download the Flare library to the project.
flare_flutter: ^2.0.2
Don't forget to add the library inside the .dart file of where you want to use your animation
import 'package:flare_flutter/flare_actor.dart';
Now that we have our basic project set up with our Flare libraries, we can create a new 'directory' called 'assets' so that we can import our '.flr' file that we exported from the editor. Add the following line in your "pubspec.yaml" and don't forget to create the folder and add your flare file inside the folder.
assets:
- assets/updating.flr
I'll make it pretty simple for everyone following this tutorial, and the following code will allow you to add more code on top of the animation. I will be using the feature called stack that allows me to create code on top of an object. So in our case, our splash screen will be used in the future as a login page or register page. So easily I can just code on top of the animation which is very useful for most of the programmers.
This is the final code:
class _MyHomePageState extends State<MyHomePage> {
String _animationName = "success";
@override
Widget build(BuildContext context) {
return new WillPopScope(
onWillPop: () async => false,
child: Scaffold(
body: Container(
child: Stack(
fit: StackFit.expand,
children: <Widget>[
FlareActor(
"assets/updating.flr",
fit: BoxFit.cover,
alignment: Alignment.center,
animation: _animationName,
),
],
),
),
),
);
}
}
That's it, straight forward and easy to use in any situation. If you want to add code on top of the animation just added after the FlareActor(). Also, I created a variable called _animationName with the intention of having more control over what animation I want to play.
In a single Flare file, you can have multiple animations, the only difference is the animation name you want to call to play it. So if you want the users to interact with the animation you can create a function that will change the name of the variable so your animation will act differently.
Running the code
The last and easiest part of this tutorial is finally here, the only thing you have to do is the following to steps
In your terminal update all the packages of your app
flutter pub get
2. Run your app in your smartphone
flutter run
So if you followed everything correctly, watch our youtube video you will have the following result
Don’t forget to follow us in:
Discord — https://discord.gg/rnEnuP9
Twitter — https://twitter.com/180NF
Telegram — http://t.me/NF_180NF
Steemit — https://steemit.com/@nf-180nf
Instagram — https://www.instagram.com/180nf/
About the Creator
180NF
Building the world's largest nutritional database, the decentralized app for nutrition and fitness.
How Does an Air Compressor Work? Understanding the Working Principle
Air compressors are indispensable tools in various industries and applications, from manufacturing plants to construction sites and even in everyday household activities. But have you ever wondered how these machines actually work? How does an air compressor work? In this article, we'll delve into the working principle of air compressors, shedding light on their functionality and significance in different settings.
By Chris Wood2 days ago in Lifehack


Comments
There are no comments for this story
Be the first to respond and start the conversation.