
How to Use Google Cloud Data Migration Service
Working of Google Data Migration Service to Migrate Data to Google Workspace Domain


Google cloud data migration service is a facility available in Google Workspace Admin Console to migrate data to Google Workspace account. Whether you are an existing Google Workspace user or using other cloud suites such as Microsoft Office 365, Microsoft Exchange, Godaddy IMAP, or any other IMAP server. This migration service allows you to migrate emails/contacts/calendars between the accounts.
Note: When the migration source is Google Workspace, this service only provides the facility for the migration of emails only. The rest of the data need to be migrated manually one by one for every user.
1. Go to www.admin.google.com and login with your Google Workspace Admin account.
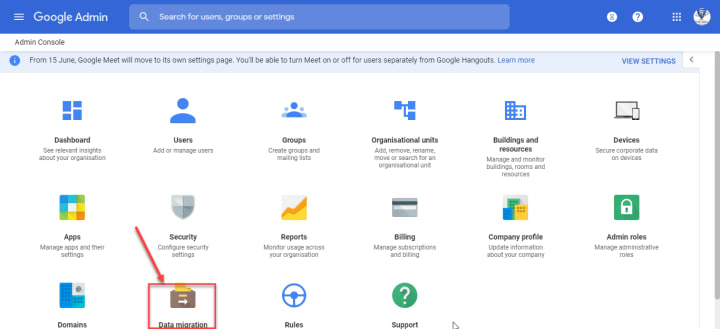
2. In the Admin Console, select the “Data Migration” tab to manage migration.
3. Now the Data Migration window will open and here you need to click on the “SET UP DATA MIGRATION” link to proceed further.

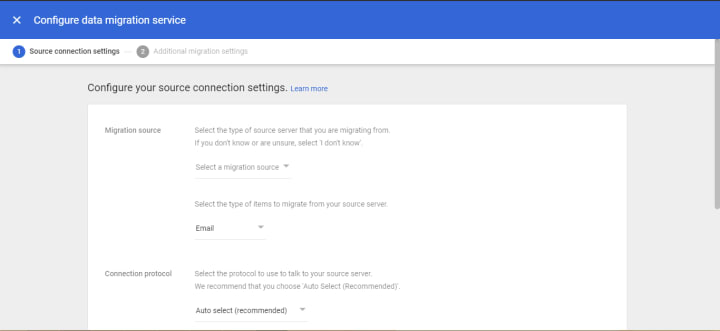
4. In the next window, configure your source connection settings by selecting a Migration Source from the drop-down option. Here, multiple options are available, depending upon the option you choose, rest of the options will work.
5. If the migration source is:
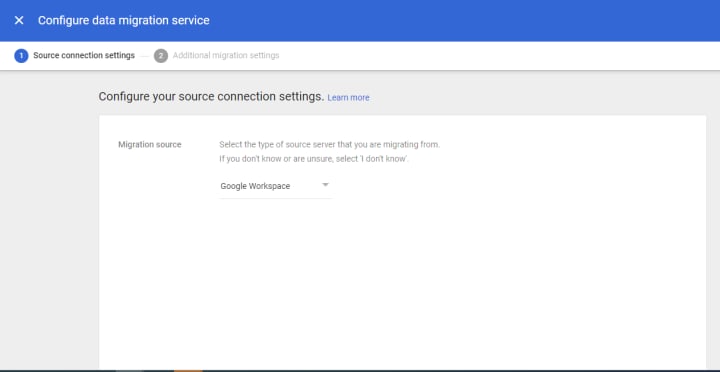
- Google Workspace: Use this option to perform the migration between the G Suite domains. This option only migrates “Email”. The rest of the applications need to be migrated manually one-by-one of every user account. Once this field is selected, all the other applications will get hidden, you can click on the Start button to proceed further.
- Microsoft Office 365: Once the migration source is selected, you can select a data type from the drop-down menu – emails/contacts/calendars (only one type of item at a time).
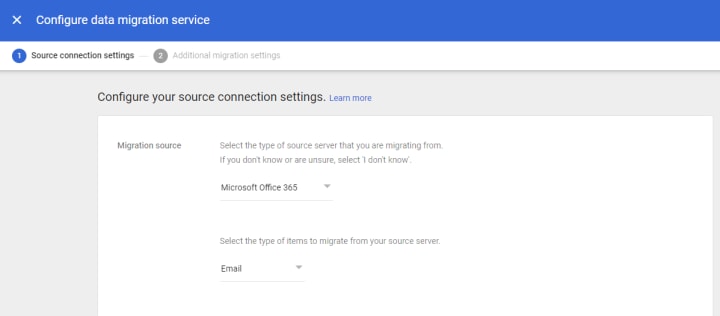
Next, choose the Connection Protocol as "Auto Select (recommended)". Finally, click on AUTHORISE button.
Now, you will redirect to Microsoft Office 365 login portal, where you need to provide the Office 365 Admin account id and provide permission to Google Workspace to access your user data.
Once the Authorization is completed, you will get back to the Data Migration configuration section. Click on the Start button to proceed with the migration steps.

6. In the next window, configure additional settings by selecting:
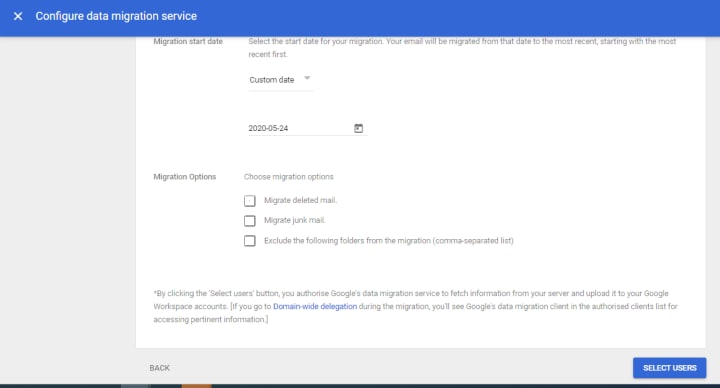
- Migrate Start Date – Provide the starting date from where you wish to migrate data to the Google Workspace account.
- Migration Options – There are three options to customize your migration: Migrate Deleted Mails, Migrate Junk Mails, Use the CSV file to exclude the folder from the migration.
7. Once all the fields are filled, click on the Select User button to proceed further.
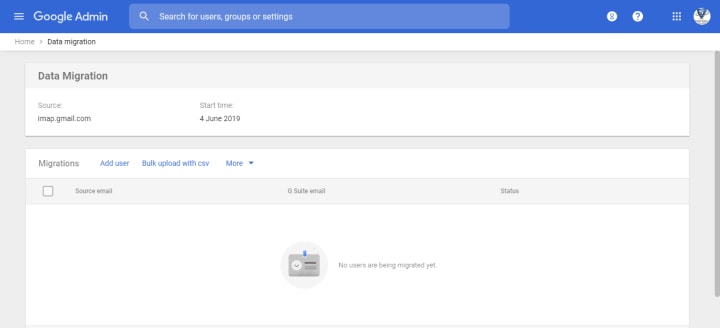
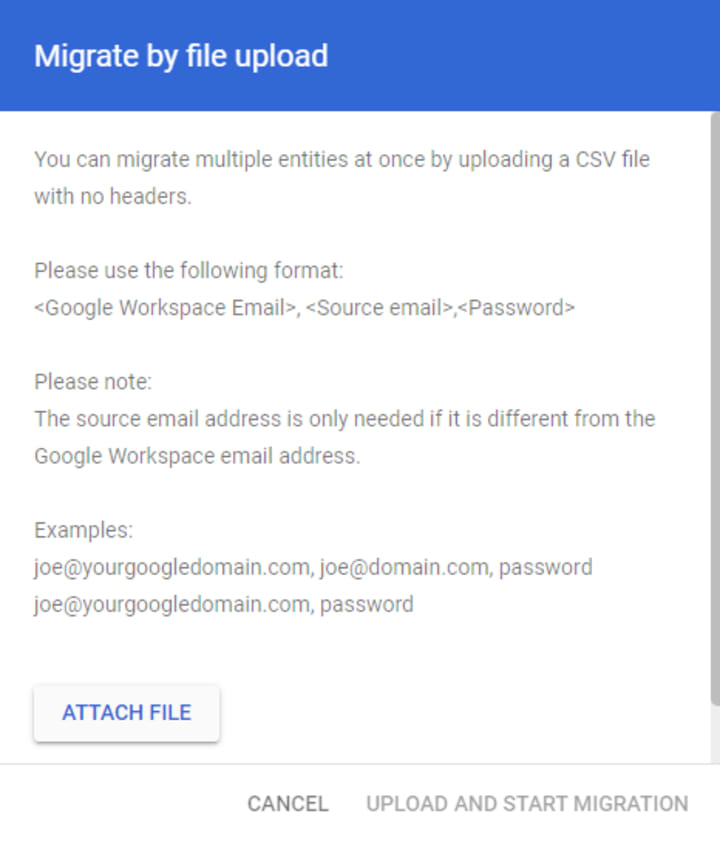
8. For the mapping between the source and destination account, choose the mapping option. Here, two options are available:
- Add User: This feature allows you to perform the mapping between a single source and destination user account. So, for single account data migration, use this option. Here, you need to enter source user id and its password and choose the destination user account.

- Bulk Upload With CSV: To map multiple sources and destination accounts, you can create a CSV file containing, list of mapped: destination Google Workspace email address, Source email address, and password. Use “Attach File” option to upload the CSV file and then click on the “Start Migration” button.
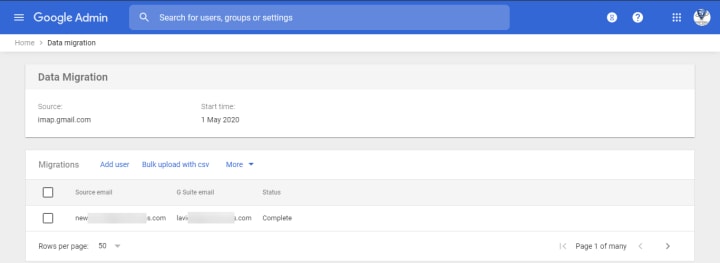
Now, the Google cloud data migration service will begin and starts migrating data to new Google workspace accounts.
You can preview the live status of the migration from the Admin Console. Once the migration of all user accounts is finished, click on More and select the Email Report button to generate the migration report.
Finally, click on More and the Exit Migration button to end the process return to the Admin Console Home.
Shortcoming of Google Cloud Data Migration Service
- This service only provides the facility to migrate emails, when the source is Google Workspace.
- Doesn’t offer simultaneous migration of emails, contacts, calendars
- No support for the migration of drive data
- Date filter is available for the only start date
When migrating manually, the G Suite Administrator needs to keep all the shortcomings in mind for a better and secure migration experience.
Final Thoughts
This Admin Guide explains the working and shortcomings of Google cloud data migration service. You can understand the working of this application using the above solution available with valid screenshots.
Read: How to Transfer G Suite to another account without leaving any bit of information in the old account.
Here, SysTools G Suite Migrator is used to migrate complete data between G Suite account. This utility also offers migration of data from other cloud suites such as Office 365.
About the Creator
Keep reading
More stories from Robert allardice and writers in Journal and other communities.
What is Tally Cloud Computing? It Could Change Accounting Experience
Tally hosting over the cloud aims to provide a seamless accounting experience and will provide amazing features once a user signed up for this service. Read on to know more about the new Tally Cloud Computing and its features.
By Robert allardice3 years ago in Journal


Comments
There are no comments for this story
Be the first to respond and start the conversation.