
How To Start A Blog For Free And Make Money In 2023
Create a blog for free in 2023 - Ultimate Beginner's Guide
It can be intimidating to start a blog, especially if you don't know a lot about technology.
Your best choice if you want to build a free blog is BlogSpot.
With the help of BlogSpot, you can create a blog with free hosting and a free subdomain. Pyra Labs, which Google acquired in 2003, founded Blogspot.
Even if you have no experience with technology or anything related to blogging, this post will guide you through the process of setting up a free blog or website.
In this Article
- What exactly is a blog?
- What exactly is BlogSpot?
- How to Start a Blog for Free with BlogSpot
What exactly is a blog?
A blog, also known as a "weblog," is a website or online journal maintained by an individual, group, or corporation that publishes regularly updated content (blog posts) about a specific topic. It is written in an informal or conversational tone and provides information in reverse order.
What exactly is BlogSpot?
The same company that owns Google also owns BlogSpot, a free publishing platform. BlogSpot was originally known as Blogger. The platform allows users to create straightforward blogs and host them on a blogspot.com.
How to Start a Blog for Free on BlogSpot
Section: (1)
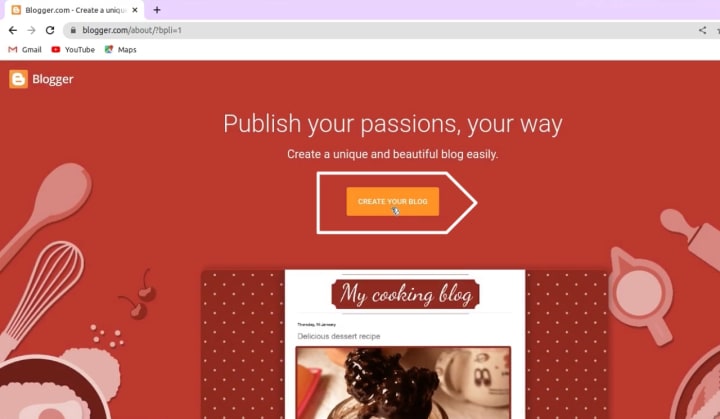
1. Start Blogger in your browser first. Enter or hit return after typing https://www.blogger.com in the address bar.
2. To begin, click the "CREATE YOUR BLOG" button. This is a large orange button in the page's middle. You will be asked to log in using your Google account.
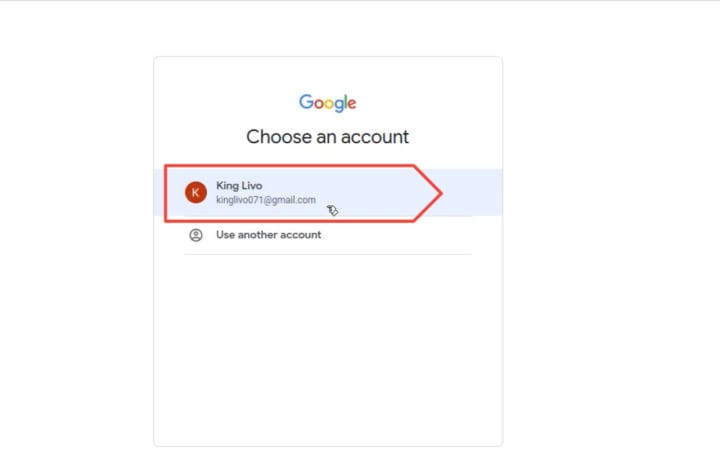
3. Use your Google account to log in. You must sign in to Blogger using your Google account.
- Enter or Choose your Gmail account.
- Click Next.
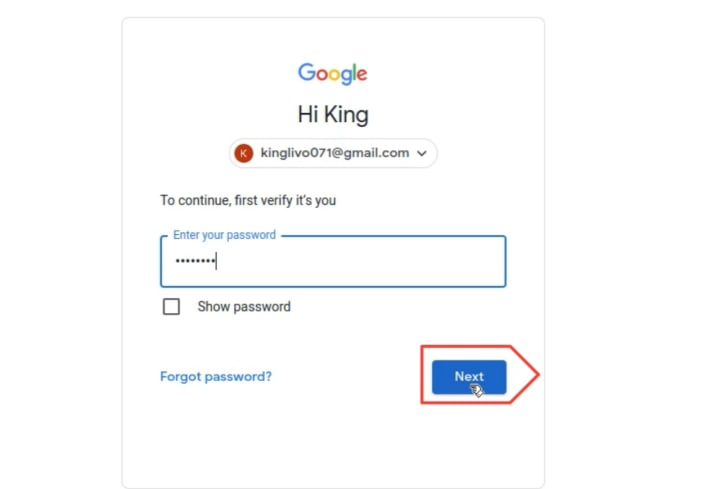
- Enter your Gmail account password
- Click Next
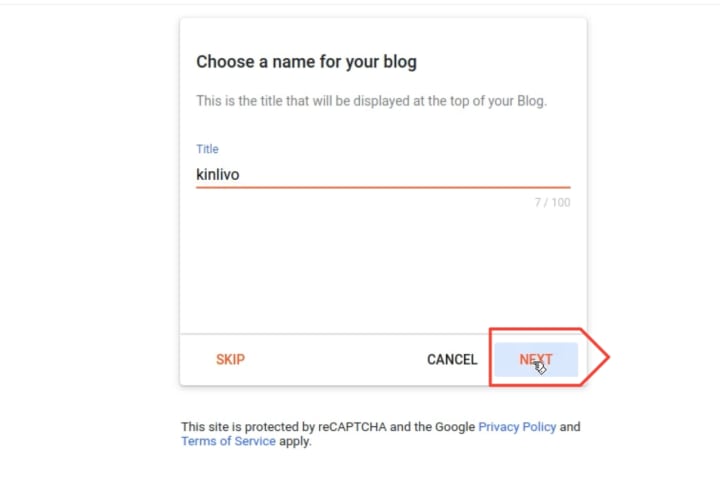
4. After you sign in, a pop-up window will prompt you to name your blog. In the text field, click the "Title" button. To proceed, enter your blog title in the text field and click next.
5. You will be prompted to select a URL for your blog in the following pop-up box. Enter the URL address for your blog by clicking "Address" in the text box.
- If the next button in the pop-up window's bottom right corner turns orange, it means you can use this address for your blog. To proceed, click the next button.
- If beneath the URL address text field it says "sorry, this blog address is not available" This means that you are not permitted to use that specific URL address. To continue, you must edit the URL address.

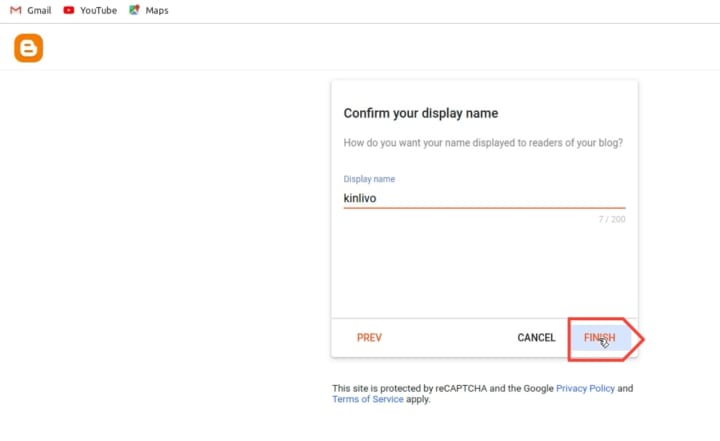
6. In the next pop-up window, confirm your display name by clicking on "display name" in the text field and entering your preferred display name. Click the "FINISH" button. (This can be found on the right bottom corner of the pop-up window).
Following the creation of your new blog, you will be directed to the admin area of your blog.
Section: (2)
I'll walk you through setting up your freshly created blog in this section.
In this Section
- How to Install Blogger Templates to Change Your Blog's Appearance
- Writing a New Post and Publishing It.
- Conclusion.
How to Install Blogger Templates to Change Your Blog's Appearance
Using either custom Blogger templates or built-in Blogger templates, you can modify the template of your site.
Using the built-in templates of Blogger, modify the templates for your blog:
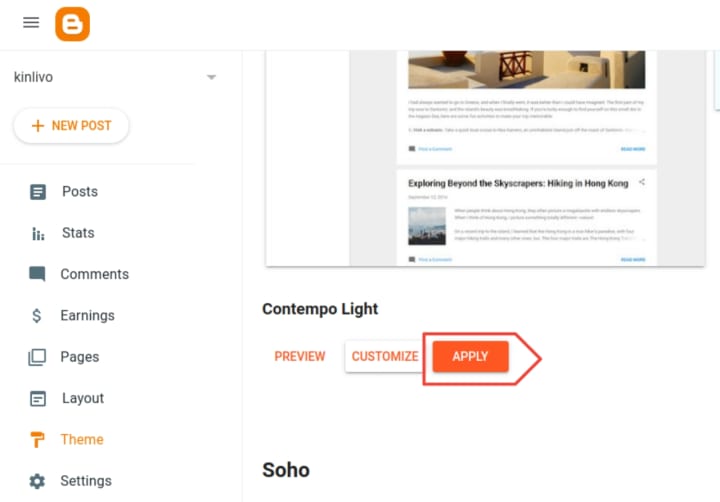
- Navigate to the Blogger Dashboard.
- In your Bloggers Dashboard, select "Theme" from the menu on the left.

3. After choosing a theme, click APPLY at the bottom.
Custom Blogger templates can be used to change the look of your blog's templates:
- Get the template package (most downloaded template packages are in a zip format).
- Using WinRAR, unzip the downloaded template package.
- Navigate to the Blogger Dashboard.
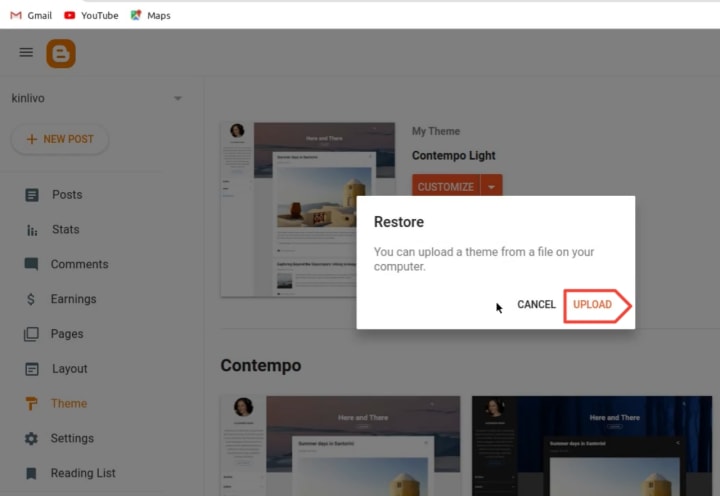
- In Blogger's Dashboard, select "Theme" from the menu on the left.

- On your right, click on the inverted triangle next to the customize button.
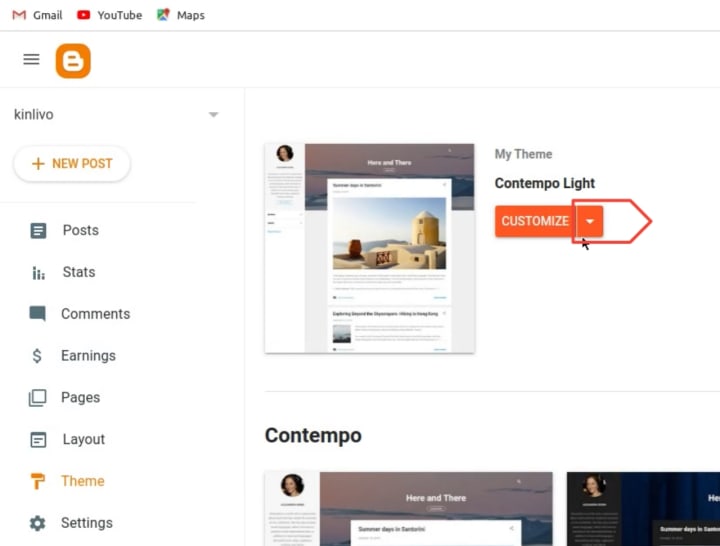
- From the drop-down option, choose "Restore."

- In the pop-up window's bottom right corner, click the UPLOAD button.
- Navigate to the folder where the downloaded template was unzipped, then select the file with the suffix (.xml).
- The template will now be applied to your blog successfully.
Writing a New Post and Publishing It
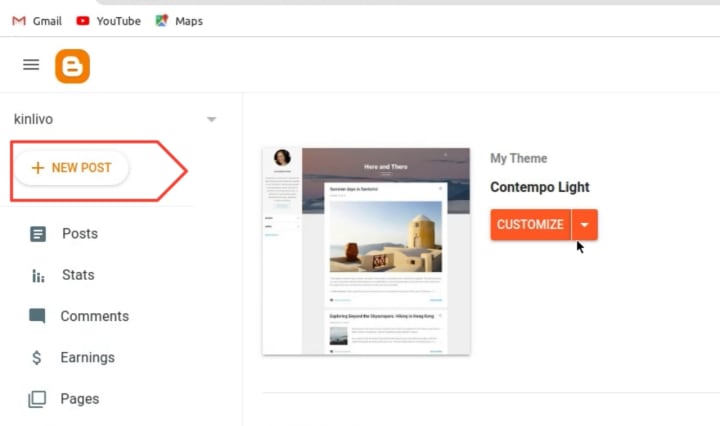
- Navigate to the Blogger Dashboard.
- From the admin dashboard of your blog, select "NEW POST" in the upper-left corner.
- Type "Post title" into the post title field in the new window.
- Use Blogger's text editor to create your blog post.
- To publish your Post, click the "Publish" button in the upper right corner. (Click the "Preview" button to see a preview of your post before publishing it).

Conclusion
I hope you were able to build your own blog effortlessly and for no cost by following the courses that came before.
About the Creator
Keep reading
More stories from Osman Mohammed and writers in Education and other communities.
The Natural Beauty of Bangladesh
Bangladesh is honored with plentiful regular magnificence. From its lavish green scenes to its beautiful waterways and peaceful sea shores, there's a lot to respect. The Sundarbans, the biggest mangrove timberland on the planet, is an UNESCO World Legacy Site and home to the Bengal tiger. The Cox's Bazar ocean side stretches for north of 120 kilometers, making it one of the longest regular ocean sea shores on the planet. Also, the tea nurseries of Sylhet, the slope plots of Bandarban, and the peaceful wide open all add to the nation's assorted and enamoring regular excellence. Bangladesh flaunts dazzling regular excellence, from its rich green scenes to its perplexing organization of streams and streams. The Sundarbans, the world's biggest mangrove backwoods, is an UNESCO World Legacy Site and home to the Regal Bengal Tiger. The moving slopes of Sylhet are popular for their tea gardens, while Cox's Bazar offers miles of sandy sea shores along the Inlet of Bengal. Moreover, the tranquil magnificence of the wide open spotted with rice paddies and vivid country towns adds to Bangladesh's appeal.
By GAMING LOVERS BD3 days ago in Education
Unveiling the Importance of 'Know Your Business' Verification: Safeguarding Your Operations in the Digital Age
In today's rapidly evolving business landscape, staying ahead means more than just providing excellent products or services. It involves ensuring compliance with regulatory standards, safeguarding against fraud, and building trust with customers and partners. Among the essential practices in this realm is 'Know Your Business' (KYB) verification.
By Jack Oliverabout 19 hours ago in Education


Comments
There are no comments for this story
Be the first to respond and start the conversation.